*Squeek*
Before the Skaven came into my life, my re-entry point into the hobby was the world of WH40K, and in particular, taking up the good fight "For the Greater Good". I put together quite a large Tau army (which you can see here)
However, the Chattering Horde blog was started to accompany me on my painting journey with Skaven, and as the Tau were before that there have been no Tau guides here.
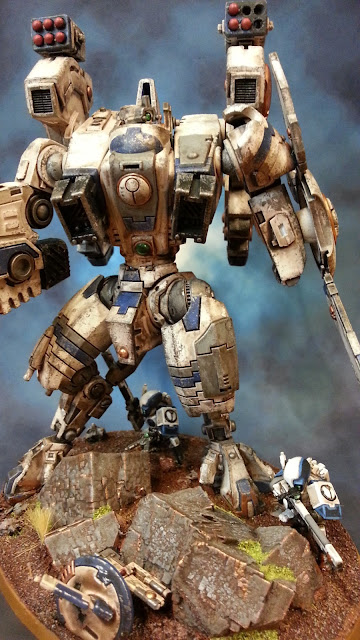
With work progressing on my Tau Riptide, I had the chance to work on two Fire Warriors that I will be using on the base. As these guys used my original army colours, but with the addition of some of the simple painting processes I learned later while working on the Skaven, I thought this would be a good chance to put up a painting guide.
A couple of things to note:
1.) I sometimes still use the original (older) paints from GW. If you need it, there is a conversion chart here and I have tried to put the names of the new paints below as well (but note, the colours don't match exactly!)
2.) This is a rough guide, suitable for getting stuff on the gaming table. No claims to greatness or expertise here. Also, it is always a good idea to paint a test model to see how it looks before ploughing ahead with a whole army.
So here we go!
Paints used (Old/ New):
- Skull White (White Scar or Ceramite White)
- Chaos Black (Abaddon Black)
- Bleached Bone (Ushabti Bone)
- Dark Angels Green (Caliban Green)
- Snot Green (Warpstone Glow)
- Dwarf Bronze (Hashut Copper)
- Shining Gold (Gehenna's Gold)
- Codex Grey (Dawnstone)
- Fortress Grey (Administratum Grey)
- Red Gore (Wazdakka Red)
- Blood Red (Evil Sunz Red)
- Regal Blue (Kantor Blue)
- Mordian Blue (Macragge Blue)
Washes:
- Badab Black (Nuln Oil)
- Devlan Mud (Agrax Earthshade)
Step 1: Preparation.
Assemble models.
Use a craft knife or file away flash/ mould lines (carefully!) Please make sure you pay attention to this on flat surfaces, such as helmets and shoulder pads, as mould lines really show up later when painted if you don't get rid of them, especially when using white paint.
Step 2: First basing. (note: the photo above shows unbased models, but I usually base everything as described below)
Sand down any flash or raised areas around the edge of the base.
Apply PVA glue
to the top of the base, being careful not to get this on the boots of
the model. (For variety, consider sprinkling a couple of pieces of
crushed coral onto the PVA before the sand.)
Immediately dip the base into modelling sand.
TIP: Rub away any sand or glue that has dripped over onto the sides of the base now if you prefer a nice (clean-looking) base later.
Optional: Finish off the bases now (see Step 7, final basing).
Step 3: Undercoat.
Spray paint the model(s) using the undercoat of your choice.
I use Citadel Skull White for my Tau. One of my army colours is white, so this reduces the number of white layers I need to add later. Many people prefer a Chaos Black undercoat. The overall effect will be darker but any bits in recesses you forget to paint or are difficult to get at just look like shadows (which is great). Unless white is an important colour in your army, you may prefer Black because it is more forgiving.
Step 4: Basecoats.
This is where you add the basic colours to your model. After you finish this, you will be a big step closer to a finished model, but the colours will be very "flat" (which is why you will then add washes in step 5, below)
- Skull White (White Scar or Ceramite White): Armour plates, helmet, rifle panels (see image above)
- Chaos Black (Abaddon Black): Boots
- Dark Angels Green (Caliban Green): Lenses on helmet (and lenses on Rifle if you prefer green lenses to red lenses)
- Dwarf Bronze (Hashut Copper): Pulse rifle lens detail (the round bit at the end!)
- Codex Grey (Dawnstone): Trousers, sleeves, neck on the helmet, rifle panels (see image above)
- Red Gore (Wazdakka Red): Pulse Rifle targetting lens
- Regal Blue (Kantor Blue): Half of helmet, lower and upper part of should pad. Center panel on armour.
Step 5: Washes.
In this step, you are going to add shadows by adding a wash. You can either paint this into specific areas, or (as in this case) add a wash all over by applying liberally across the model.
- Badab Black (Nuln Oil)
- Devlan Mud (Agrax Earthshade)
To give a dirty, grubby effect, use Devlan Mud. On weapons, or metallics, Badab Black is very effective. In this case, I think I mixed 50/50 and applied to the whole model.
Tip: To save time later, consider not applying washed to the helmet. If you do and you are using white, you will have to reapply several layers of white later (as I did for the model above)
Step 6: Highlights
Highlights provide further differentiation to the raised parts of the model from the shadowed areas you created by adding shadows. (Drybrushing is another way to do this.)
- Skull White (White Scar or Ceramite White): reapply to edges of armour.
- Bleached Bone (Ushabti Bone): reapply to edges of pulse rifle white panels.
- Dark Angels Green (Caliban Green)/Snot Green (Warpstone Glow): apply 50/50 mix to the edge of the lenses on helmet and/ or rifle as appropriate.
- Dwarf Bronze (Hashut Copper)/ Shining Gold (Gehenna's Gold): apply 50/50 mix to the upper edges of the pulse rifle part (the round bit at the end)
- Codex Grey (Dawnstone): reapply to raised folds of the trousers and sleeves, as well as to the upper edges of the boots.
- Codex Grey (Dawnstone)/ Fortress Grey (Administratum Grey): apply 50/50 mix to the very top of the raised folds of trousers and sleeves.
- Red Gore (Wazdakka Red)/Blood Red (Evil Sunz Red): add 50/50 mix to lower corners of targetting lens on the Pulse Rifle.
- Blood Red (Evil Sunz Red): add to lower corner of targetting lens.
- Mordian Blue (Macragge Blue): Edges of shoulder pads.
TIP: The Firewarrior model has a couple of lenses (the Pulse Rifle targetting reticle and the lenses on the helmet). I found this tutorial about lenses on the absolutely excellent Advanced Tau Tactica site to be very useful (not to mention all their articles and tactica!)
Step 7: Final Basing
Note: Although the models in the picture above are not based, the process described is what I usually do.
Calthan Brown: Overbrush across the base, being careful to avoid the boots/ legs of the model.
Snakebite Leather: Drybrush across the base. Paint the base edges. I usually find 2 coats gives a nice smooth finish.
Codex Grey: Drybrush lightly across the base, paint any crushed coral.
Fortress Grey: Drybrush any crushed coral rocks to add a natural highlight. Paint on PVA glue, and then sprinkle static grass onto the base.
...and that is it!
I hope one day to have time to go back to my Tau army and use washes and stuff, but when I do, this is how I will do it.
Cheers,
*Squeek*