Monday, September 19, 2022

Folklore: The Affliction. Problems and solutions (part 2.)


Folklore on the table

So what is Folklore like to play?
For me...
...fantastic, but with one or two caveats.


Overall though the game has definitely given me what I wanted:
  • A game with lots of 'theme'.
  • Opportunities for roleplaying.
  • Captures the feeling of an 'RPG', with a story you can move through with characters.
  • Dice chucking, combat, and character management (lots of stat management on character sheets!)
  • No model painting (a second printing comes complete with standees.)
I've also enjoyed:
  • Overland movement, transitioning to really nice maps for adventures.
  • Making decisions in the story, and not knowing how they will play out until later.
  • Interesting pre-prepared character types.
  • Standees - they really look better than I thought.
  • Skirmishes - an alternative combat mode for quick fights when you are on the road.
No game is perfect though, and the more I played the more some issues other players and reviewers noted did become apparent. However I did find some answers that work for me, giving me a balance between the level of challenge and enjoyment I want. None of the ideas below are mine!

Swingy D100 system

This game uses D100...a lot! That means that your rolls can be very swingy, and an emotional rollercoaster. I don't think there is an easy answer to this, but levelling up does help, as does having access to equipment bonuses (see 'Tiny market' below.) There are fans who have moved the whole system to D20, which probably would work better if D100 gets you down.

'Dicefest' combat 

If you play the game with the normal (base game) rules, combat doesn't feel tactical. You'll end up with a big cluster of standees in a one part of the adventure map, simply taking turns rolling D100. At the lower levels, that means you will miss - a lot, so combat can really drag on, and on...and on! Also, turn order can mean that an enemy can go first, rush in, and back you into a corner that you can't get out from. 

To deal with this, checkout the 'advanced rules' from the expansions, as well as 'Encounter Tactical variants' house rules that you can find on Board Game geek. This made the game much more fun for me. These add rules to allow you to expend power points to push an enemy back or force your way past an enemy. They also add bonuses based on facing, outnumbering the enemy, moving out of an enemy's threat area, and more. This not only gives you a better chance of hitting but brings combat to a much swifter conclusion after you have whittled down your enemies to a last one or two.

For additional options, the initiative track mechanism introduced in Fall of the Spire really helped make combat more interesting. It does make combat longer to setup, but for me the pay off was worth it. I liked never knowing who would end up with initiative at the start, and also the little element of tactics introduced by the 'Tactics cards' that provide bonuses. These don't usually make a huge difference, but they an give you (and your enemies) small bonuses that gives you something extra to think about.

You can see this system in the image below. The track is at left, with a mix of standees and tokens to represent where combatants are on the track, and tactics cards (the blue and red arrows) being available.
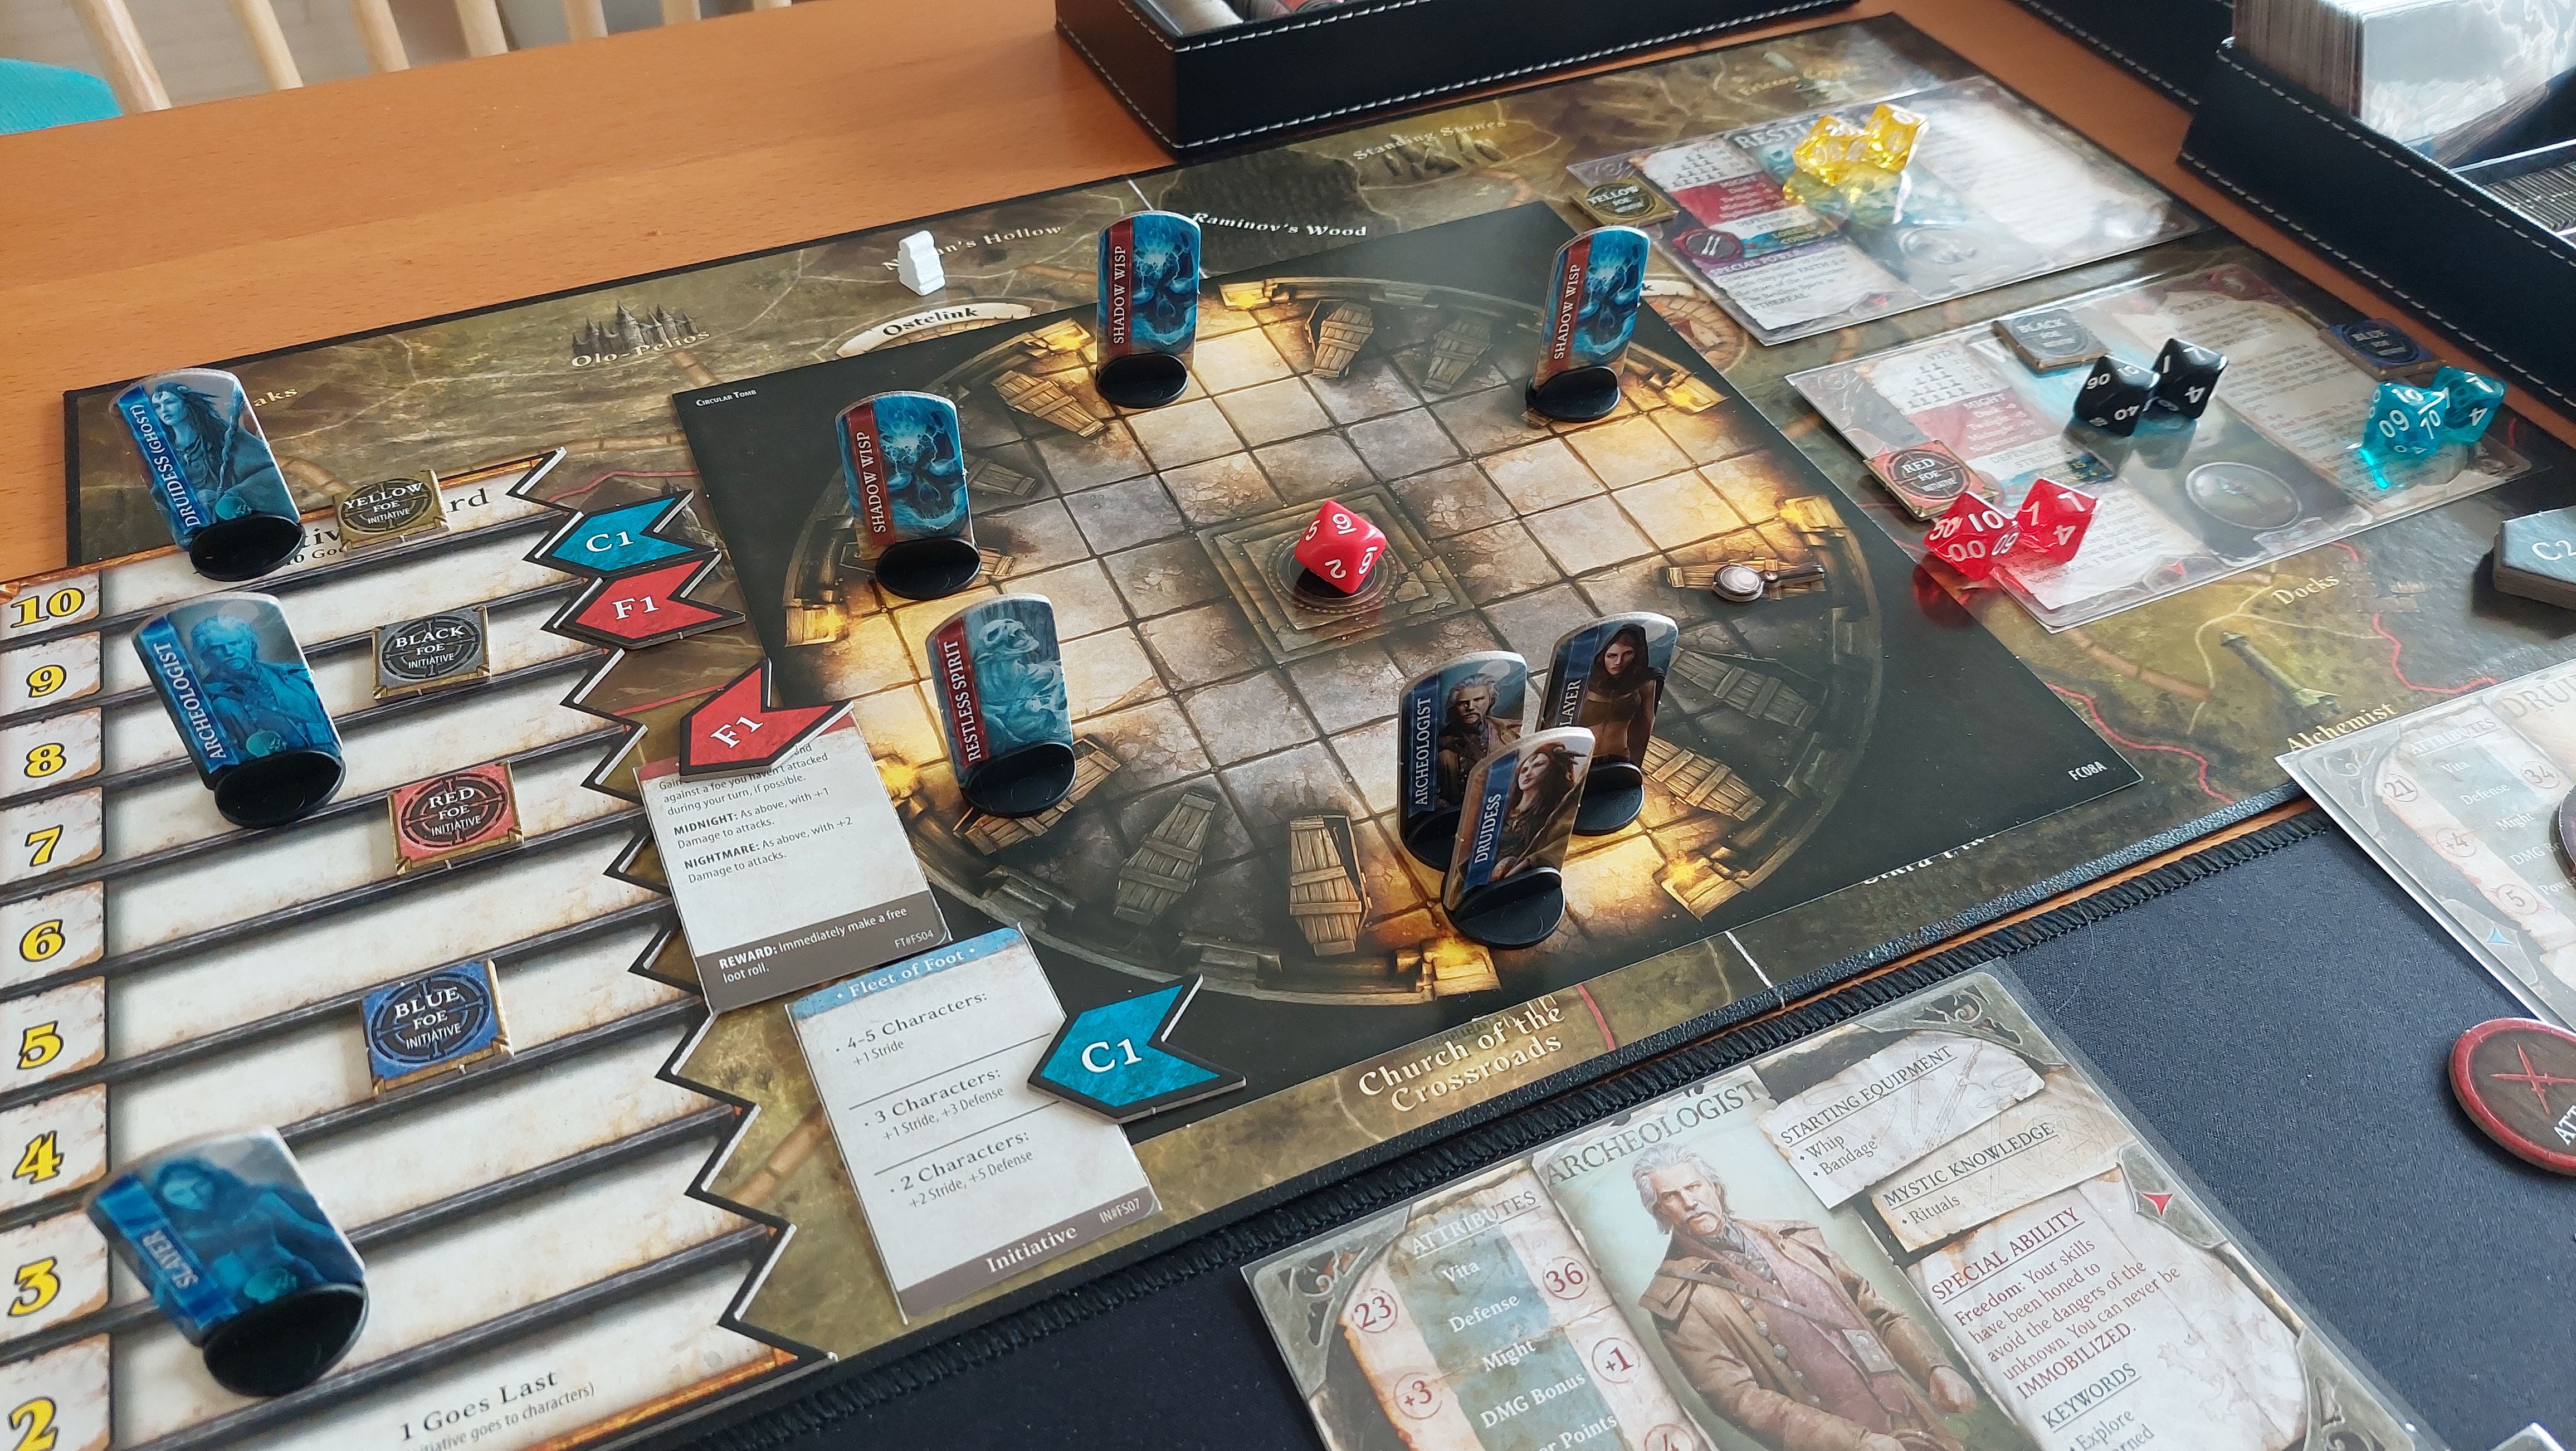
Folklore: The Affliction combat and initiative track.


Punishing overland travel

The very well-realised world you travel through is a big plus of the game for me. It is dark and dangerous, and so it can also be incredibly punishing. As you travel you will have road or off-road encounters. Many of these lead to 'Skirmishes'. Usually quick to resolve they don't involve any setup or standees - a lovely system. BUT, these can happen way too often, and if you have bad rolls they end up really stomping you. Especially if you play the core rules, you have limited options to rest, making these skirmishes particularly deadly.

On the road again. The white party marker is at Waylin Point.


The best way to mitigate this I found was including a 'cautious travel/ fast travel' mechanic. Full credit to William Shaffer, who outlined this and other ideas on this thread.

When traveling on road, the party can travel cautiously or hastily. When traveling cautiously, you only draw an event of a result of 1-5 on a d10. When traveling hastily, you always draw an event, but you add +2 to your movement (+3 with a carriage). This allows the party to better control the flow of travel depending on how prepared they feel. You always draw an event when traveling off-road, and cannot travel hastily. I like this house rule because I don't want to burn through all the road event cards too fast, and it avoids the tedium of getting too many skirmish battles.

A detailed world: Just add two drops of depth

As you travel the world presented, the theme here really shines through. One example is visiting one of the three towns on the map. Each is of a different size and when you arrive, the game provides you with different locations (market, stables, chapel, alchemist, gypsy encampment, tinker etc.) Depending on the character you have chosen, you may get different bonuses or access to different services or things to buy. This is really great, as it helps you feel that you character is different. One issue however is that in the core game, the marketplace is quite sterile - in fact barren! Very few items are available to purchase by default. William Shaffer (see link above) offers a variant marketplace that makes the market...feel like a market!

'When shopping at a marketplace, you can draw either 5/10/15 consumables to buy from and 3/5/9 weapons/armor/enhancements per visit to the city (the slashes denote the size of the city).'

With this simple change (provided you have the money) you have some difficult decisions to make and levelling up feels like a real opportunity to spend your newfound wealth. It may make the game a little easier, by having more items available in town, but if that worries you make the market 'dynamic': Every time you visit shuffle the marketplace cards, and remove 2-3 at random - dwindling supplies are an every day occurrence for the citizenry of Kremel...

The change above is easy to make, but the second is part of one of the expansions: the 'Rumor' system. This was introduced in the 'Dark Tales' expansion of 2017. In this, you always have the chance to visit one of the local pubs in town, and once there you can pick up a 'rumor' to follow. Essentially this is a side-quest. 

You can see an example rumor card here:
Image: Boardgamegeekstore.com

Each rumor offers you a chance to pick up lore and coins (or other rewards) by completing the side quest. I really have been enjoying these because they help you level up and pick up coin that you can spend at the marketplace. They are also a nice diversion from the main story that can be played separately.

Busy bookkeeping - Folklore; the Affliction Assistant

Depending on what you are looking for in a game, the amount of bookkeeping in F:TA can be a plus or a minus. On the positive side it really gives you an old-school RPG feeling. You have a character sheet (or several) with a range of stats that change as you adventure and also contribute to your dice rolls. That pen-and-paper RPG feel is a plus for me, but it can get REALLY busy, even when using a fan-made PDF (see BGG files for more info.) This can be particularly true when playing solo with more than a single character.

The answer to this issue for me was to use the fan-made app on my Android phone. 'Folklore Assistant' is on Google Play (I don't think it is available for Apple devices but please check.). Kudos to the developer for their work on this. They are responsive to issues and the updates have been really useful to me. 

Eryalana, the Druidess

All cards and tokens are included

Stats are easy to track

Combat can be done in app


The app allows you to do all the bookkeeping that you normally need, just as if you were using a printed character sheet. As you add equipment and level up, your stats automatically adjust. However it ALSO allows you to manage combat in the app, export your characters, and play background music!

So that is how I've been enjoying Folklore! The core experience is really solid, but to get the right blend of challenge and fun (for me) it needed a few easy house rules. Adventuring in this world has brought me lots of really enjoyable hours at the kitchen table - with many more to come.

Tuesday, September 13, 2022

Folklore The Affliction. Problems and Solutions (Part 1.)

 Folklore...

...the Affliction' update:


It's been a long time (months!) between posts. 

In my 'cheap organizer solution' post for Folklore the Affliction, I had ended with a cryptic '...while exploring all the boxes and fitting everything together I discovered a BIG PROBLEM (To be continued)' and then never wrote a follow-up!

However a Gmail notification let me know that an anonymous comment had asked, '...to be continued, when?' and that has spurred me into this post - an update on the problem and then another post on my experience with the game. 

What was the big problem? In this post I'll address one problem, and in the next some gameplay challenges that I encountered.

'Affliction' indeed...

As you can tell in the organizer post, I was really enjoying finding a way to store the game, and I managed to get everything together in one box - the base game box. As is usual for me, as I played through the game I had been checking BGG and Reddit posts for information about the game - rules clarifications and such - and I came across posts about a mould issue with the Fall of the Spire expansion. In short, some of the boxes for the expansion were found to have mould, which kicked off a number of issues for the publisher and the Kickstarter. 

I checked my boxes, and sure enough, I had been 'afflicted' with mould in both the Fall of the Spire expansion and the core game box. A bit difficult to see in these images, but there it is!


 'No problem!' I thought - this mould is not harmful, and it can be removed. On reflection though I decided they had to go. I live in a country that can get very, VERY humid in summer and all my boxes are stored packed closely together in a cupboard which is not air-conditioned. Was the amount of mould excessive? Maybe, maybe not, but in the end I wasn't comfortable with the situation, so I binned both boxes.

I sent a polite email to the publisher asking about a replacement box, but didn't hear anything back. That was a shame - I know they had done the right thing when this issue was discovered by communicating with their backers - so I had hoped for some response. I know they have also had problems with their website over the months and again, there is some concern now that they have gone out of business. (Which I truly hope is not the case! This is an excellent game.) We are now several years past the release, so it also wouldn't be surprising if there were no replacement boxes available.

Unfortunately, getting the original boxes also proved to be difficult on ebay as well. If you can find an empty box, it can be about 20~30 USD, with another 20 USD for shipping. As much as I like the game, that doesn't make sense for me so (for now) all my Folklore materials are in the Dark Tales box.

I'll keep an eye out for a cheap box by haunting the usual places, but I'm not getting my hopes up. For now, everything fits into a mould-free box, and that is OK with me.

See you next time, when I provide an update on how the game has been to play, and approaches to house rules that have significantly improved my enjoyment of the excellent title.

Bye for now and thanks for reading.

Sunday, April 24, 2022

Half-day DIY: Dirt Cheap Game Card Holder

 In Folklore: The Affliction...


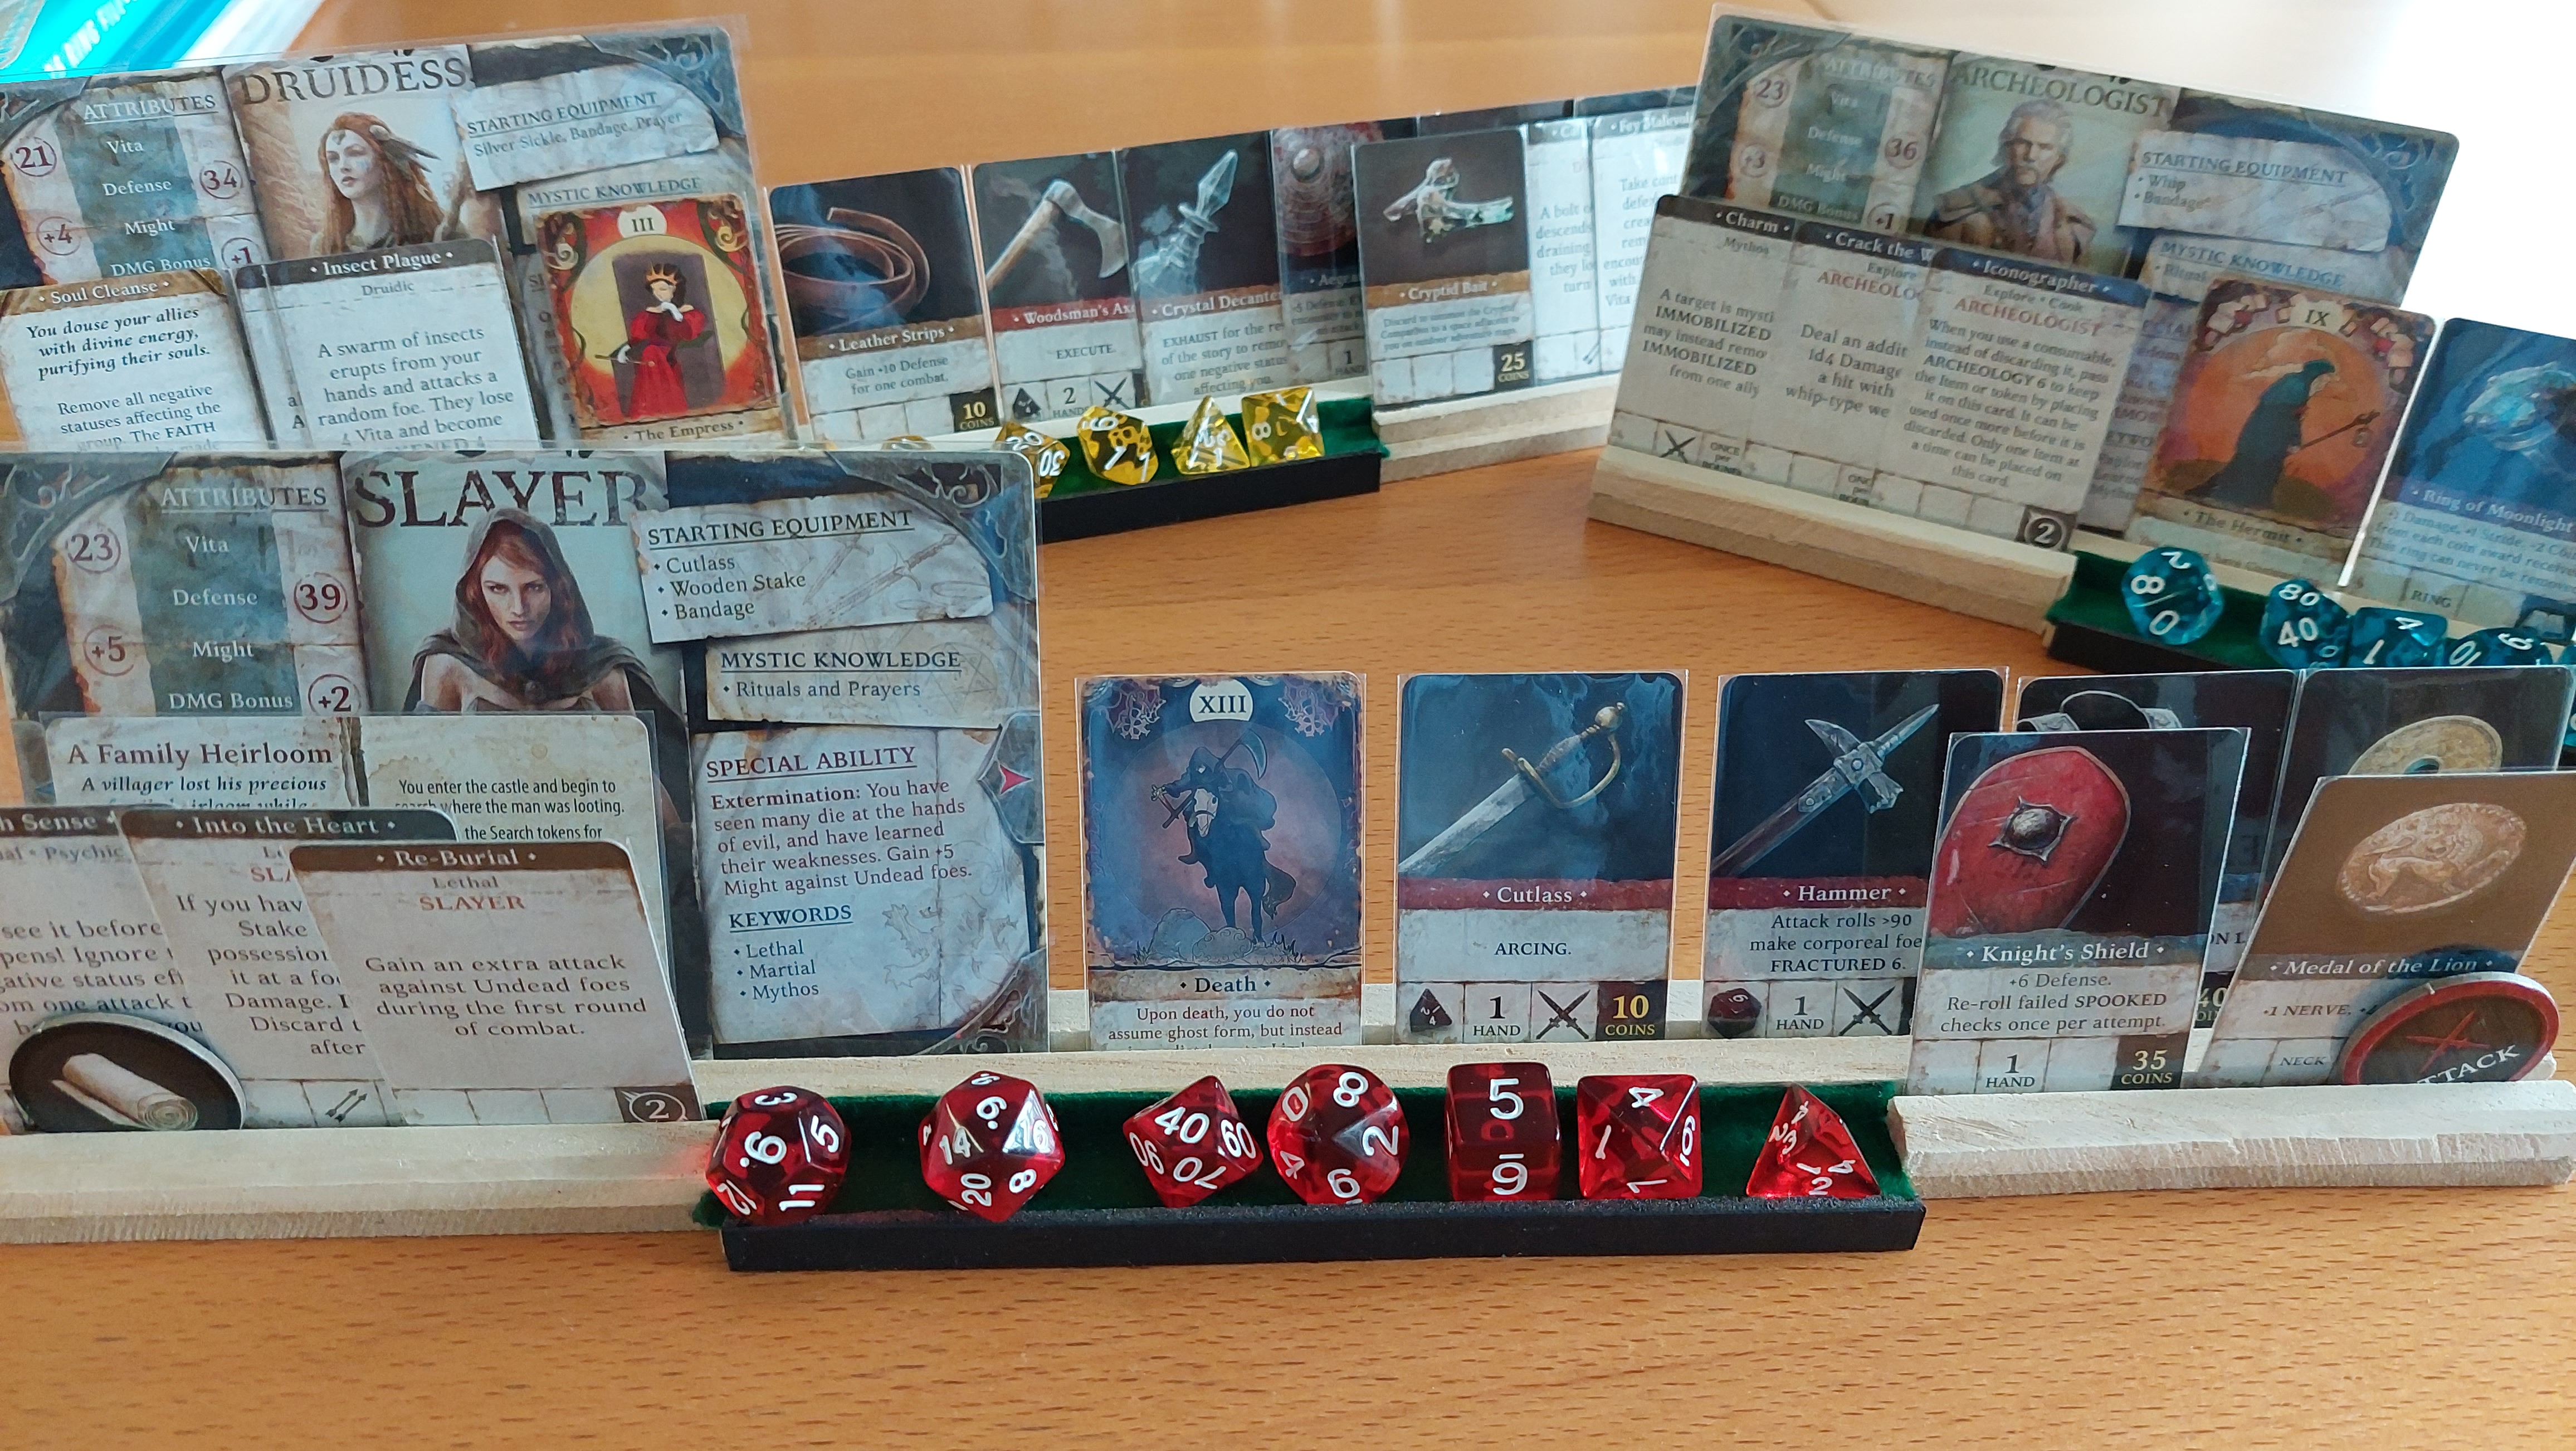
...space is at a premium, especially if you are playing solo, and even more so if the only place you can game is a small kitchen table. In the image above I have three characters and their equipment laid out before me (using the sold-separately Equipment Pack). There isn't really any room to write, update my stat sheet, or put a rulebook (or a fourth party member). Also, the more I go through a session, the more cards get messed up. After my last session, I decided I had to get better organized - ideally giving me more table space.

A short Amazon search later, I noticed that there are plenty of 'Game Card Holders' for playing cards. Ranging in price from 10$ to 30$ (before shipping) these come in plenty of different sizes and materials - with wood naturally being more expensive.

I like the idea, but not the price. With a 100Yen/ Dollar Store near me (Daiso) could I put something together? Sure, it probably won't look as nice, but here is what I came up with.

Materials


  • MDF board x1 (200mm x 400mm x 6mm/ 7.87in x 15.75in x 0.24 in) - 1~2 USD
  • Wooden square rods x4 (910mm x 9mm 35.82in x 0.35in) - 2 USD
  • Wood Glue (white glue/ 'Elmer's Glue') - 1 USD
  • Saw
  • Pencil (for marking out)
  • Felt (optional)

Result

Here is what we ended up with, including some measurements, and some photos of the card holders in action.

I included a small dice tray at the front, and lined that with cheap green felt offcuts.


...and there you go. I like the end result. Due to the plain wood they look cheap - because they are - but they get the job done.

:-)

Happy gaming

Monday, April 4, 2022

Folklore The Affliction: Cheap organizer solution


The Game

Folklore: The Affliction is a tabletop 'RPG in a box', published by Greenbrier games. According to Boardgame Geek the core box was published in 2017. Expansions were released in 2017 (Dark Tales) and 2021 (Fall of the Spire). 

After watching a lot of reviews, I decided to purchase the core set. Despite having some flaws that most reviewers seemed to agree on (what game doesn't?) I felt the game offered me plenty of elements that I am currently looking for:
  • A game with lots of 'theme'.
  • Opportunities for roleplaying.
  • Captures the feeling of an 'RPG', with a story you can move through with characters.
  • Dice chucking, combat, and character management (lots of stat management on character sheets!)
  • No model painting (a second printing comes complete with standees.)
After the game arrived, I played a chapter solo (with a party of three characters) and really enjoyed it (despite a hard party wipe at the final battle!) I looked around further and discovered that the expansions offered new stories, rules and systems that would take the world of the game to another level. I invested in both expansions (rather than just use the rules PDFs) and both boxes duly arrived (and the 'Equipment' pack, which includes cards for all the equipment in the game.)

The Challenge

I find Folklore to be a gorgeous game with lots of high-quality components. A thick map of the world, tactical maps (on thin card), standees, mini-Euro sized cards for components and abilities etc. 

Did I say 'lots'? Let's see how many components we are talking about?
By my count: 1,615 bits and pieces (I may have made some mistakes, but I totaled publicly available info in this Google sheet.)

Living in an apartment in Japan, I don't have a lot of storage space. Could I fit all of this into a single DIY box organizer? If so, how?

The Tools

In the past I've made my own box organizers from foam core for Descent 2e, and Mansions of Madness 2e. I enjoyed the challenge but it can be very time consuming. In my lazier (or more lucid!) moments, I've found the 100 Yen shops here in Japan a great way to get small storage bits and pieces and organize boxes at low cost. I did that with Gloomhaven and most recently with my Mage Knight organizer. 

So what to do with Folklore, where I want to get the content from three boxes into one? Some creative 100 Yen shopping was in order. After a few shopping trips (including carrying the box in with me for some testing) here is what I ended up with!

  • x6 'PU' (Polyurethane) fake Leather' trays. (600 yen, approx 5 USD)
  • x3 acrylic token trays (each with 5 sections) (300 yen, approx 2.45 USD)
  • x1 'Cube' storage box with drawer (100 yen, approx 0.80 USD)
  • x1 foamboard (black). 10mm thickness (100 yen, approx 0.80 USD)
  • x1 glue gun (200 yen/ 1.60 USD) with x20 black glue sticks (100 yen/ 0.80 USD)
  • x2 sets of three 'Book bands' (200 yen/ 1.60 USD). Basically giant elastic bands.
Total cost: 1,600 Yen or approx 13.05 USD.
For reference, here are a couple of images of the most important parts. If you can't get these, you may be able to find something of the same size OR create them from foamboard.

'PU leather' tray. (26cm x 10cm x 4cm) I used 6 of these.

'PU (fake) leather tray details/ dimensions

'Multi-connect box'. x1 (8cm x 7.7 x 8)

Multi-connect box dimensions.

Glue gun. This uses 7.5mm glue sticks

Clear acrylic tray. x3 (17.8cm x 7.2 x 3.0 )

The Result

In the photos below, let's open the box and explore layer-by-layer. (Stay with me - lots of photos!)

Top layer: rulebooks, world map, tactical maps


The box: yes, it doesn't close (a possible deal-breaker for some), 
but fixable with foamboard 'walls'.

Top layer includes the fold-up map...

...rulebook and all three Story Journals...


Underneath the journals are all the tactical maps.

Lay the maps aside and here is a foam card topper.

Bottom layer: standees, cards, and tokens

Then we reach the core of the box. A PU leather standee tray, a 
central 'valley' with enemy cards, and a DIY card holder (black, at top).
Also made of PU leather trays x2 (one of which is used as a lid)

The standee tray (bottom) holds just over 200 standees. Enemies
are sorted alphabetically L-R, with characters at right.

Removing the PU box cover at top reveals it to be another PU tray,
to which I've added some partitions (glue gun).
The bottom half holds all the mini-Euro sized cards.

Here is that layer again in full!

Standee tray removed. Underneath is another PU leather tray,
within which is our first acrylic token tray and Town events deck.

Zooming in, you can also see the initiative track (vertical, at left)
and the character cards (vertical, at right.) Top right there are three
small grey pouches. What is in them?

Each pouch contains the equipment and ability cards for
one of my party members (I run with three.)

I've readied the initiative track (L) and pulled out the PU 
leather tray and placed it to the right. This has revealed
another PU leather tray With Road events deck and another acrylic tray beneath.

At the top of the box is a matching PU leather tray, with
the Rumor deck and other tokens.

The enemy and character cards from the 'valley' and which
are tucked down the side of the box are removed.


With most of the trays out, we can see the small storage box
that contains miscellaneous tokens and other (easily lost!) pieces.

Dice are also held in a small pouch. Let's roll!

So with most things out, you can see the cards 'ready to play' 
(at right), so they can be easily drawn.

Here is another view. Note how the small cards are stacked
vertically in the space between the acrylic trays and the PU leather trays
-ready to be used.

Here is another view.

Phew! There is a lot of stuff. The positive is that I can get everything into 'one box'. The issue is that the lid doesn't close. That annoys me, but I'm thinking of adding in some foam or plastic walls to add some rigidity and hide the insides.

Overall, I'm very happy with getting everything together BUT...

...while exploring all the boxes and fitting everything together I discovered a BIG problem.

(To be continued.)

Saturday, March 19, 2022

Painting Mage Knight Miniatures


EDIT: For some reason all the formatting in Blogger has gone haywire for this post. Sorry for the odd formatting...don't forget to rest your eyes after reading!

First released in 2011, Mage Knight includes painted miniatures. Although unusual for a tabletop game (which even now don't tend to come with painted minis) this made full use of one of the unique selling points of WizKids HeroClix as the character components, pre-painted stuff.

HeroClix itself launched in 2000. A collectible miniatures game focused on painted characters, each model has a 'Combat dial' base that moves to indicate damage or special abilities. While Mage Knight doesn't use combat dials for the four hero characters in the base game (instead reserving them for the city models) they do come painted and 'ready to go' on clear plastic bases. Let's take a look at them 'out of the box' first.

Four against...the unknown

The game gives you four heroes and four cities represented in game by one of the models below.


Repainting the set

I bought the game because there are painted models so I could play immediately, so why repaint them?

Improve the paint job to match the game quality.

As you can see above, each model comes essentially with 'base colours' only. In some cases these paints are applied sloppily and with a very limited range of colours, so I wanted to tidy them up. What you can't see here is that the game map tiles are lovely (scroll up to the top image). The models should be up to that standard.

Add detail.

The models look flat because they don't have any shading. This particularly applies to the cities, which are 95% white plastic with a dab of identifying colour on the roof of each city. I felt that I could capitalize on the base painting by simply adding a wash (to bring out the shadows) and a highlight to make things pop a bit.

Improved components for little investment.

This would take much less time that painting from bare plastic.

So what did I do?

  • Washes. Agrax Earthshade/ Nuln Oil/ Reikland Fleshshade etc. This is an easy way to add shadows and depth to the models, looks great, and is dead simple.
  • Highlights. Use lighter shades of the 'from the factory' colours to add more depth.
    • Edge highlights.
    • Drybrushed highlights (to quickly bring out detail on materials like chainmail).
  • Details where necessary:
    • Strategic spot varnish (crystal ball on Arythea's staff).
    • Gems (Tovak's sword).

Results

And here we are! I've included 'before and after' photos with a couple of notes below. (Note that lighting conditions were different, but I hope the point will be made!)

Tovak

Featured on the box art, Tovak is your basic 'sword and board' mini. I like his weird dynamic 'crouching' pose - he looks hunkered down but ready for action. He comes mainly painted black, which makes it difficult to see any detail on him. Look closely though and there are places you can easily spruce up.

  • Nuln Oil wash on the shield, sword, chainmail etc.
  • Coloured the eyes with a green, light glow.
  • 'Gemmed' the sword (blue gem).
  • Details (sword hilt and pommel).
  • Drybrushed the armour (steel) so that the raised areas have colour.


Enhanced: Gem, eyes, painted details (hilt, crossguard),
drybrushed edges like gauntlets, gold etc.

Original: No washes, no drybrushing etc.

Enhanced: Drybrushed armour.

Before: Shield - flat colours

Enhanced: Nuln Oil wash, silver metallic highlight,
gold drybrush

Goldyx

The draconoid Mage Knight is probably my favourite sculpt. I like the pose and the simplicity of the model overall, and that he is carrying a book (at least he has something to ready while I spent 15 minutes trying to work out how to win the next combat). The large sweeping areas of skin are perfect for washes to add some depth, and there are opportunities for little details (jewelry, book etc.)

  • Agrax Earthshade wash (all over) to add depth.
  • Highlights on the base colours, and/ or drybrushes - especially skin.
  • Details such as book edges, rings, bracelet, pouch etc. (Jewelry in particular - which comes painted yellow.)

Before: notice yellow bracelets, flat colours

Enhanced: Washes, green highlights, drybrushing. 
Details: gold ring, bracelets, claws etc.

Before

Enhanced: Agrax Earthshade washes, highlights and layers (robes),
drybrush wings, and some detail (scabbard fittings), claws/ nails.

Before

Enhanced: Agrax Earthshade wash (see shadows in the wings)
 drybrush, details

Arythea

I found this character both the hardest and the easiest to enhance. At first glance you can't see any detail because of the black used, but a simple drybrush brings them out - easy and quick! BUT, what is going on with the face and 'mask'(?) No matter how I look at the face I just can't get what the sculpt is supposed to be. Are there eyes?

  • Biggest difference here was drybrushing red the 'web' texture of the cape.
  • Drybrush hair (grey).
  • Magical staff 'orb': highlights, and then spot gloss varnish.
  • Washes: Reikland Fleshshade.

Before

Enhanced: Green magic orb, washes on skin
drybrushed web/ cape

Before: flat black cape, hair.

Enhanced: Red drybrush on cape, green orb,
drybrushed grey on hair.

Norowas

The elf Mage Knight has some great textures to work with. Chainmail, cloth with lots of folds, some platemail, nicely defined facial features (compared to Arythea above...)

  • Nuln Oil wash over metal armour. Lots of armour here so this makes a big difference!
  • Reikland Fleshshade wash on skin, then Tallarn Flesh/ Elf flesh highlights.
  • Drybrush the cloth (trousers).
  • Details - blond layers on hair, bronze armour fittings.

Before

Enhanced: Nuln Oil washes on armour/ chainmail with
Runefang Steel drybrush. Skin with layers. 
Agrax Earthshade on cloth, with blue highlights. 
Gold details.

Before

Enhanced: Lighter brown layers on boots.
Sword guard in bronze

Before

Enhanced: Nuln Oil washes on armour, gold details
and highlights, different yellow for hair,
Tallarn Flesh highlights on arm. 

Cities

Strangely enough, these are the components that came out the best after a bit of work! I like the look now more than any of the other pieces. The 'enhanced' versions just look better and impactful for little work and they leap off the table (in my eyes).

  • Agrax Earthshade wash to bring out shadows/ texture.
  • Drybrush white to add more depth/ contrast.
  • Repainted coloured roofs and highlighted.
Before

Enhanced: Agrax Earthshade wash, white drybrush

Before

Enhanced: Agrax Earthshade, white drybrush,
rock base has an Agrax Earthshade wash, grey drybrushing
and light grey edge highlights

Cities!

There we go!

Although I bought Mage Knight in part because I didn't want to spend a lot of time painting before playing (why am I so obsessive about that?) it was a pleasure to 'add' to these. They look good on the table and have moved from 'playable' to 'enhancing the game' - even if only because I know I put some time into them!


Now, when will I get to enhancing the Lost Legion characters...

General Volkare...

...and Wolfhawk


Thanks for reading. Take care and happy gaming everyone.

Related Posts Plugin for WordPress, Blogger...