*Squeek*
 |
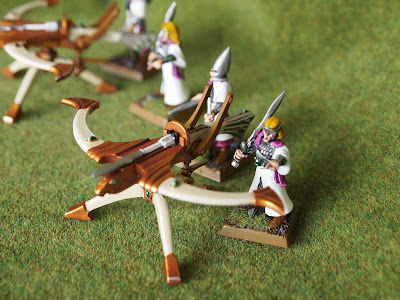
| High Elf Bolt Throwers on the field of battle! |
One of the signature weapons of any High Elf army, the repeater bolt thrower is a great little model and an easy way to add some devastating firepower to any HE army. I painted these a while ago, so this guide will use the paints I used at the time - the "old" citadel miniature paints. I don't know if anyone has any of those left though, so you can use this conversion chart to see the new equivalents in the current paint range.
In this guide, we will cover both the crew and the warmachine.
Before we get started, please note that I painted these some months ago, so I may not have remembered exactly which paints I used, but I think they are in the ballpark!
Paints:
- Chaos Black (spray undercoat)
- Chaos Black
- Skull White
- Bleached Bone
- Codex Grey
- Snot Green
- Dark Angels Green
- Snakebite Leather
- Calthan Brown
- Tallarn Flesh
- Dwarf Flesh
- Elf Flesh
- Mithril Silver
- Dwarf Bronze
- Shining Gold
- Liche Purple
- Warlock Purple
- Sunburst Yellow
- Devlan Mud
- Ogryn Flesh
- Gryphonne Sepia
- Badab Black
Step 1: Preparation
Smooth down any mould lines left on the model. I usually use a file for this.Step 2: First Basing
Sand/ file down the edges of the base and apply PVA glue to the top (or watered down PVA glue). Then sprinkle a few pieces of crushed coral on. After that, quickly dip in modelling sand.Crushed coral is available at any pet shop in the aquatic section. I find that it adds a bit of interest to the base by providing some small "rocks". Allow to dry before Step 3 (below)
Step 3: Undercoat
I usually use GW Chaos Black or Skull White spray cans for this for the sake of convenience. In this case I used Chaos Black.Many people probably use a light undercoat for High Elves as this gives a brighter overall effect at the end, and requires fewer coats of paint to cover. I like Chaos Black because it hides mistakes and forms natural shadows when left in the creases of a model.
Important: Don't hold the spray too close to the models! That could make the undercoat too thick and can obscure detail on the model. It is better to have not enough and then do a second layer if necessary.
Step 4: Basecoat(s)
This is where we add the basic colours to the model. Later on we will add highlights and washes to add depth.Codex Grey: Robes. After the Codex Grey then add...
Skull White (NOTE: you may have to do 3-5 layers of white to get a smooth effect!)
Mithril Silver: Armour/ scales, vambraces, helmets, belts, bolt tips etc.
Calthan Brown: Boots
Liche Purple: Edges of hauberk/ sashes
Tallarn Flesh: Skin (face, hands)
Dark Angels Green: Gems on belts and on bolt thrower.
BOLT THROWER:
Bleached Bone: Bolt Thrower arms and legs.
Dwarf Bronze: Metal pieces on bolt thrower (tips of the arms, levers, feet)
Dark Angels Green: Gems on belts and on bolt thrower.
Mithril Silver: Bolt (tip), and "stock" (the rear of the weapon).
You can see in the image above that with only basecoats applied, the models are looking better, but are very "flat". The next step, "Washes", will add shadows, making the model seem more natural and "3D"
If you are wondering about the gems, we will get to them in Step 6...
Step 5: Washes
 |
| You can see the washes on the bolt thrower metallics - darker areas. The crew are NOT washed here. |
...BUT NOT THE SKULL WHITE ROBES!!)
CREW:Ogryn Flesh: Skin, hands.
Badab Black: armour.
Devlan Mud: crew bases.
Gryphonne Sepia: On the hair (if you did it sunburst yellow previously)
BOLT THROWER:
Gryphonne Sepia: Any areas of the bolt thrower where you used Dwarf Bronze.
Step 6:Layers
CREW:
Tallarn Flesh/ Dwarf Flesh/ Elf Flesh: Skin. (50/50) Add Elf Flesh to make skin even lighter.
Skull White: eyes.
Chaos Black: pupils.
Liche Purple/ Warlock Purple mix (50/50) Edges of hauberk/ sashes. Layer up with an intermediate mix (30/70) to a pure Warlock Purple
Green Gems: Dark Angel Green/ Snot Green mix: (70/30 mix, layering up to a 30/70 mix along the bottom edge of the gem). Add a tiny dot of Skull White at the top of each gem.
Step 7: Drybrushing/ Edge Highlights
 |
| You can just make out that the armour and vambraces have been lightly drybrushed or highlighted |
Mithril Silver: Swords, helmets etc.
You could either drybrush or edge-highlight (or both). In the photo above the armour plate over the stomach has been edge-highlighted along the top edge.
(It looks better when viewed a few feet away on a gaming table)
Sunburst Yellow: Hair.
BOLT THROWER:
Shining Gold: Edges on the Bolt thrower metallics.
Step 8: Final basing
CREW:Calthan Brown: Overbrush across the base, being careful to avoid the boots/ legs of the model
Snakebite Leather: Drybrush across the base. Paint the base edges. I usually find 2 coats gives a nice smooth finish.
Paint on PVA glue, and then sprinkle static grass onto the base.
Here are some shots of the finished unit:


