Sunday, September 16, 2012

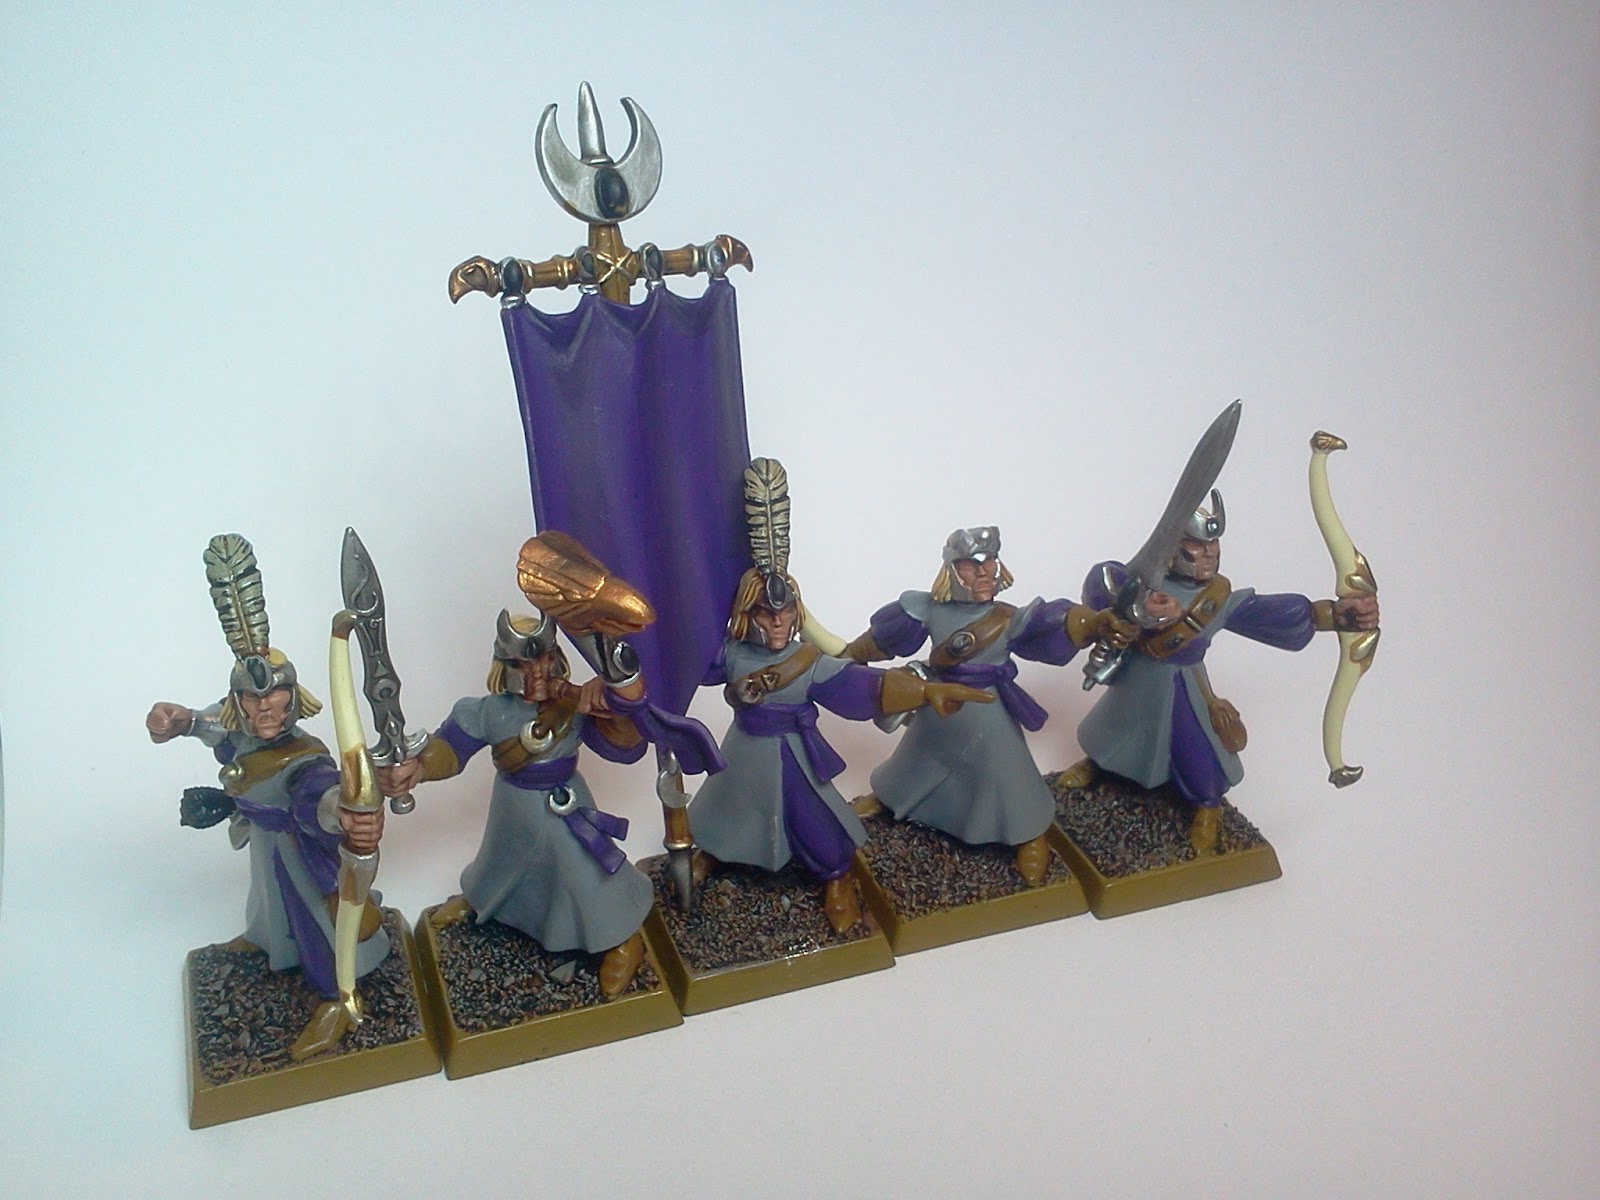
How to Paint Swordmasters of Hoeth.


"One, two! One, two! And through and through
The vorpal blade went snicker-snack!
He left it dead, and with its head
He went galumphing back."

(From "Jabberwocky" in "Through the Looking-Glass" 1871 by Lewis Carroll)


*Squeek*

If any Warhammer Fantasy Battle Unit looks like they are carrying "Vorpal blades", it has to be these guys. (Surely the "head" in question could be Skaven, Ogre or Undead?!)

It has been a long time since I added a painting guide, so as it is a long weekend here in Japan I thought I would take the chance to get one more up, this time for the Swordmasters of Hoeth. The usual warnings apply: 
1.) I'm no expert
2.) This is "tabletop quality" (I can't do any better)
3.)  I am using the old GW paints. (You can find a conversion chart here)
4.) I painted these some months ago, so I may not have got everything exactly right (many people paint a "Test model" first before doing a whole unit to try out various colours, it may be a good idea here too!)

So, off we go!

The first step is to marshal your forces...(ahem, paints and washes)
  • Chaos Black (spray undercoat) 
  • Chaos Black
  • Skull White
  • Bleached Bone
  • Codex Grey
  • Space Wolves Grey
  • Knarloc Green
  • Snot Green
  • Dark Angels Green
  • Snakebite Leather
  • Calthan Brown
  • Tallarn Flesh
  • Dwarf Flesh
  • Elf Flesh
  • Boltgun Metal
  • Chainmail
  • Mithril Silver
  • Dwarf Bronze
  • Shining Gold
  • Liche Purple 
  • Warlock Purple
Washes:
  • Devlan Mud
  • Ogryn Flesh
  • Griffin Sepia
  • Badab Black

Step 1: Preparation

Smooth down any mould lines left on the model and/ or cut away any flash. ("Flash" being excess plastic left on a model from the creation process.)

The Swordmasters of Hoeth have had centuries of practice with their lethal blades so no doubt rarely lose fingers in model-making accidents. If you haven't had a lot of practice using a craft knife or blade to remove parts from the sprue or carefully cut away flash, then please take careA file is just as good at this (imho) - and less lethal!

Step 2: First Basing

For some reason, I like to do part of the basing at this early stage. I think it is because once I have painted the full model I find it really depressing to then have to do lots of work on the bases.

Anyway, sand down the edges of the base and apply PVA glue to the top (or watered down PVA glue). Then sprinkle a few pieces of crushed coral on. After that, quickly dip in modelling sand.
The crushed coral is available at any pet shop in the aquatic section. I find that it adds a bit  of interest to the base by providing some small "rocks". Allow to dry before Step 3 (below)

Step 3: Undercoat


Undercoat the model. I usually use GW Chaos Black or Skull White spray cans for this for the sake of convenience. In this case I used Chaos Black
Many people probably use a light undercoat for High Elves as this gives a brighter overall effect at the end, and requires fewer coats of paint to cover. I like Chaos Black because it hides mistakes and forms natural shadows when left in the creases of a model.
The choice is yours!

The key thing is not to spray too close to the models, which makes the undercoat too thick and can obscure detail on the model.

Step 4: Basecoat(s)


Swordmaster with some of the basecoats mentioned below


Codex Grey: Robes. (This will form an undercoat for the Skull White in step 6.)
Chainmail: Armour, helmets, armoured boots fittings on banner. Note: If you are in a hurry or doing a very large unit, scale armour is easy to drybrush, as this naturally leaves shading in the recesses between the scales.
Mithril Silver: Spearhead, swords etc.
Calthan Brown: Standard shaft. (This will be a basecoat for the Bleached Bone later.)
Liche Purple: Edges of hauberk/ cloth belts/ helmet plumes
Tallarn Flesh: Skin (face, hands)
Dwarf Bronze: Armoured "wings" on the thighs, sword fittings, musician's instrument fittings.


You can see in the image above that with only basecoats applied, the model is looking better, but is very "flat". The next step, "Washes", will add shadows, making the model seem more natural and "3D"

If you are wondering about the gems, we will get to them in Step 6...

Step 5: Washes

Washes are an easy way to add very realistic looking shadows and visual interest to your models, and they are dead easy to apply! (Literally, just wash them over the model!)

Ogryn Flesh: Skin, hands.
Badab Black: armour.
Devlan Mud: base.

Step 6:Layers

Adding lighter layers to the basecoats brightens up the models,
but leaves shadows in the recesses from the "wash" process. Gems not done...
Adding washes will have toned down the whole model and added shadow. Now we will "Layer" on some lighter tones of the basecoats that we used before, in order to add highlights.


Tallarn Flesh/ Dwarf Flesh/ Elf Flesh: Skin. (50/50) Add Elf Flesh to make skin even lighter.
Shining Gold: Fixtures and fittings on armour, sword fittings etc. 
Skull White: Robes/ eyes. (Leave Codex Grey in the folds of the robes to provide some shading.) 
Chaos Black: Pupils. (Try to add just a tiny dot to the center of the eye) To be honest - I find the eyes the hardest thing to do!
Liche Purple/ Warlock Purple mix (50/50) Edges of hauberk/ icons on breastplates/ unit banner. Layer up with an intermediate mix (30/70) to a pure Warlock Purple

Bleached Bone: Spear hafts, musician's instrument.
Snot Green/ Skull White: The enchanted runes on the unit leader's sword should glow a bit I reckon. Start with a Snot Green, and then add more and more Skull White into the mix until the center of each rune is a very white-green (if that make sense)

A special word or two on gems: (Because there are around 50 to do in a unit of 10 swordmasters. Just sayin')
Gems...beware thy sanity oh owner of any High Elf army...

I tend to leave gems until  after drybrushing (step 7 below), because I worry that drybrushing is an imprecise process that could easily spread the drybrushed colour over the gems, ruining the effect. If this doesn't worry you, they could easily be done at the same time as the other layers.

Oh, and a tip for the gems is to add a tiny dot of Skull White to the top and bottom of the gem, this adds a really nice effect!
Red Gems: Red Gore/ Blood Red mix: (70/30 mix, layering up to a 30/70 mix along the bottom edge of the gem)
Green Gems: Dark Angel Green/ Snot Green mix (70/30 mix, layering up to a 30/70 mix along the bottom edge of the gem).  Also the enchanted writing on the unit leaders sword.
To see how these turn out, take a look at some of the images at the end of this post.

Step 7: Drybrushing

Drybrushing Mithril Silver leaves Badab Black wash in the recesses,
something you can just make out here on the helmet and armour.
 Mithril Silver: Swords, helmets etc.

Step 8: Final basing

Nearly there now.

Calthan Brown: Overbrush across the base, being careful to avoid the boots/ legs of the model
Snakebite Leather: Drybrush across the base. Paint the base edges. I usually find 2 coats gives a nice smooth finish.
Codex Grey: Drybrush lightly across the base, paint any crushed coral.
Fortress Grey: Drybrush any crushed coral rocks to add a natural highlight.
Paint on PVA glue, and then sprinkle static grass onto the base.

Tip: One thing I noted in my post on Spearmen: "Think about how grassy you want the base to look". I prefer not to overdo the static grass and always leave some of the underlying earth showing through...

Voila!

Here are some shots of the finished unit, with gems done (photos against a Games Workshop Battlemat)


Sunday, September 9, 2012

A Bargain with Chaossss!


*Squeek*

I was sad to hear a couple of weeks ago of a friend deciding to move back to the States from Japan. One of the downsides to being a long-term resident of a country not your own is that seeing people you know and like leave is a bit of a downer - you know chances are slim that you will see them again...

...the upside however was that this friend decided to shift as much wargaming stuff as he could at a very reasonable price.

In light of 40K 6th edition coming out and my recent interest in Warhammer Fantasy armies I was naturally very interested in this particular collection. Here is what I picked up:

WARHAMMER 40K: Chaos Space Marines.


  • CSM Defiler (unassembled)
  • CSM Rhino (assembled and partially painted)
  • CSM Bikes x2 (assembled and unpainted)
  • CSM Khorne Berzerkers x8 (assembled and primed black)
  • CSM Basic troops x40 (9 heavy weapons, 6 special weapons, 25 basic guys) (assembled with a mix of unpainted, primed black and partially painted)
  • A CSM plastic bits grab bag. Enough to make 8-10 basic guys and spruce up vehicles.
Got to be honest, I have never necessarily been a huge Chaos fan - it is exactly the opposite ethos to the philosophy of my beloved Tau after all ("For the Greater...Bad!"?). 
However, with the 6th starter set including a Chaos army I thought I might be able to pickup that side of the starter kit at a later date. This would fill out the army with some leadership (Chaos Lord), manpower (Chosen), cannon fodder (Cultists) and a bit more close combat ooomph (Helbrute). Just one problem I already see is a distinct lack of vehicles in the stuff I picked up and the starter set stuff. That means a lot of footslogging...
...any remedy or recommended options for this issue? Any Chaos Space Marines players out there care to comment?

WARHAMMER 40K: Other


  • Old school Eldar grab bag (10 models all partially painted)
  • Tyranid Carnifex (assembled and partially painted. Arm sockets are magnetized)
  • Enough Tyranid bits to kit out the Carnifex with a bunch of different configurations.

WARHAMMER FANTASY: Tomb Kings.

If it wasn't Skaven that I chose for WFB, it probably would have been Tomb Kings. I like the back story and the fact that these guys are wordless, totally disciplined, and neutral!? 

  • Tomb Kings battalion box. (NIB) 
  • Tomb Kings Tombguard (NIB) 
  • Tomb Kings Screaming Skull Catapult x1 (metal, unassembled) 
  • Tomb Kings Necrotect x1 (NIB)
  • Tomb King x1 (Finecast)


WARHAMMER FANTASY: Chaos Warriors/ Orcs

  • Chaos Warriors Archaon (NIB)
  • Chaos Warriors Chosen x12 (metal, unassembled, unpainted)
  • Black orcs x4 (metal, unassembled, unpainted)


WARHAMMER FANTASY: Armybooks (current run)

  • Beastmen 
  • Warriors of Chaos


TERRAIN:

  • Plastic hills x2 (partially painted)
  • Warhammer fantasy tower (assembled and primed)
  • Warhammer fantasy temple (assembled and primed)
  • Warhammer 40K downed flyer terrain from the battle for Maccragge box (unassembled and unpainted)


BEST OF ALL?

2 big Bitz boxes of Fantasy and 40k bits!

To my gaming colleague and friend who is leaving: THANK YOU and SAFE TRAVELS!
*Squeek*

Saturday, September 1, 2012

Return of the...TAU?

+System Reboot COMPLETE+
+Incoming Message+ 
+Incoming Message+


Well, you probably thought this blog was dead didn't you? 

TBH, you would have almost been right. I have now recognized that I contracted a bad case of painting exhaustion, perhaps brought on my too much sustained painting over time.
Skaven (in some numbers)
High Elves (the birthday secret surprise project)
...and Dust Warfare.

I am happy to say that I am starting to regain my interest in painting and modelling, thanks in large part to the return to the gaming table of my first interest (I hesitate to say "great love")...
...The Tau!

Reasons for my renewed interest:

1. The publication of 6th Edition Warhammer 40K has renewed my interest in modelling and wargaming in general (regardless of whether you like the system, the universe is an incredibly well-developed one.)

2. Many of the new rules make Tau a far more viable army than they had been in the previous edition (apparently). This includes some of my favorite models such as Firewarriors and Stealth Suits.

3. I already have a considerable size Tau army to go back to war with.

Several years ago when I got back into the hobby, I decided to collect a Tau army. I loved the design of the models, the unit types (mecha? carnivorous alien parrot warriors? giant hover tanks with massive railcannon?) and the  backstory of this young race struggling to establish itself amongst a galaxy of hostile, older civilizations.

Thanks to them being my first model painting in some (ahem) 20 years, I can't say that when I painted the Tau I did so with any great success. I didn't really know about washes, painting damage, edge highlighting or various other things, but I did love the colour scheme I chose!

As my copy of the latest rulebook is on order, I am going to take some time and get out my Tau and see whether I should give them a makeover using any of the techniques that I have tried with my Skaven (even if I haven't mastered them yet.) In the meantime, here are some pics of my cadre!

+WARNING+ +LARGE IMAGES AHEAD+ + WARNING+

Crisis Suits

Commander

Stealth Suits


Kroot Hounds
Kroot!


Broadside Team Leader


Pathfinders
Pathfinder Devilfish
Firewarriors

Skyray
Hammerhead

Gundrones
Piranha


Sniper Drone Team
Ethereal
Firewarriors
Does all this mean that The Chattering Horde won't have any Skaven any more? Of course not!
:-)

+Squeek+!

Thursday, July 19, 2012

How to Paint High Elf Archers

*Squeek*

Below is a fairly simple step-by-step guide to painting High Elf Archers. These were one of the first units I painted in the Sons of Xereus. Hope you find it useful!

EDIT: Following the launch of the latest Citadel Paint range in 2012, please note that the colours listed below are from the previous range. I hope to have time to rewrite in the future, but for the time being, you can use the conversion chart/ list I made here or use the official Citadel Conversion chart here.

Paints used:

  • Skull White
  • Snakebite Leather
  • Bleached Bone
  • Chainmail
  • Mithril Silver
  • Dark Angels Green
  • Snot Green
  • Liche Purple
  • Warlock Purple
  • Calthan Brown
  • Tallarn Flesh
  • Dwarf Flesh
  • Elf Flesh
  • Sunburst Yellow
  • Dwarf Bronze
  • Codex Grey
  • Fortress Grey

Washes:

  • Gryphonne Sepia
  • Ogryn Flesh
  • Badab Black
(Wow, I can't believe that I used that many different colours on a model that looks so simple...but I did!)


Step 1: Preparation.

Assemble models.
Use a craft knife or file away flash/ mould lines (carefully!)  With archers in particular make sure you pay attention to this on their robes and bows, as mould lines really show up later when painted if you don't get rid of them!


Step 2: First basing.

Sand down any flash or raised areas around the edge of the base. 
Apply PVA glue to the top of the base, being careful not to get this on the boots of the model. (For variety, consider sprinkling a couple of pieces of crushed coral onto the PVA before the sand.)
Immediately dip the base into modelling sand.

TIP: Rub away any sand or glue that has dripped over onto the sides of the base now if you prefer a nice (clean-looking) base later.


Optional: Finish off the bases now (see Step 8, final basing).


Step 3: Undercoat.


Spray paint the model(s) using the undercoat of your choice. I use Citadel Chaos Black. Many people prefer a Skull White undercoat for brighter models like High Elves as the overall effect will be brighter and you will need far fewer layers of Skull White later on robes etc. 
However, I often use black as it hides mistakes etc.


Step 4: Basecoats.


Codex Grey: Robes (this will be an undercoat for the Skull White later.)

Chainmail: Bracelets/ bracers, helmets, details on bow, swords.
Bleached Bone: Bow stave, bow case, hair, pouches.
Snakebite Leather: Belt, shoes.
Liche Purple: Sleeves.
Dark Angels Green: Gems
Tallarn Flesh: Skin.
Calthan Brown: Unit standard pole.
Dwarf Bronze: Musical instrument.

TIP: I didn't do the Skull White robes until after washes (step 5 below) had been done.


Step 5: Washes.


Ogryn Flesh: Skin

Devlan Mud: Sleeves, belts, shoes, (leathers)
Gryphonne Sepia: Hair, details on bow, bow case.


Step 6: Layers.


Skull White: Robes (leave Codex Grey in the folds to provide some shading.) If using Skull White, be prepared to use many, many thin layers. 
TIP: Don't be tempted to do thick layers though, the end effect won't look very nice.

Liche Purple/ Warlock Purple mix (50/50) on sleeves. Layer this up to a purer Warlock Purple to provide highlights on the raised areas of the sleeves (30/70) 
Bleached Bone: Bow, edges of bow case, strands of hair
Tallarn Flesh/ Dwarf Flesh mix (50/50)
Dark Angel Green/ Snot Green mix: Gems. (70/30 mix, layering up to a 30/70 mix along the bottom edge of the gem)
Dwarf Bronze/ Shining Gold mix: (50/50) on the musician's instrument.

TIP: To make your gems really stand out, consider adding a tiny dot of pure Skull White at the top and/ or bottom of the gem.


Step 7: Drybrushing.

Codex Grey or Skull White drybrushed on the arrow fletchings.


Step 8: Final basing.

Calthan Brown: Overbrush across the base, being careful to avoid the boots/ legs of the model.
Snakebite Leather: Drybrush across the base. Paint the base edges. I usually find 2 coats gives a nice smooth finish.
Codex Grey: Drybrush lightly across the base, paint any crushed coral.
Fortress Grey: Drybrush any crushed coral rocks to add a natural highlight. Paint on PVA glue, and then sprinkle static grass onto the base.

I think that is it!


Cheers,
*Squeek*

Related Posts Plugin for WordPress, Blogger...