'You can evade, but you can't hide!'
You get 28 monster models in Fantasy Flight's Mansions of Madness 2e. This doesn't include the e
ight different investigators that come in the box. I'm happy to say that the enemy types are varied and come in a range of sizes. The sculpts aren't up to the highest standards of more recent games, but they are fairly detailed, easy to paint, and get the job done.
In this post you'll find photos of each monster type, followed by brief notes of how they were painted. This isn't an exhaustive painting guide, so it doesn't include detailed recipes. However I've listed the colours I remember using, and that will give you a starting point for using or mixing.
Before scrolling down, please note:
- I've put them on the bases that come with the game for now (not glued), but in the future I'm likely to use clear acrylic bases instead. Purpose-made sets of these can be found on Etsy (with holes for the feet pre-drilled) or you can buy some from Amazon.
- All of these models were varnished for durability with at least two coats. Usually this will start with a gloss varnish (Citadel 'ardcoat) and then a matt varnish to dull down the shine and provide extra protection (Citadel Stormshield). This leave a satin finish. I don't mind that as a trade-off for the durability. As you'll see below some areas use varnish for effect too.
- In the text I've picked out paints used in bold for your convenience. I use citadel as I already have these and they are easy to get. I use a lot of Contrast paints, but the new Army Painter speed paints would work just as well I'm sure.
- The backgrounds in the images are shared by other bloggers. Visit the end of this post for the links.
Child of Dagon
This chap looks to have risen from a watery grave (or a grave of some kind...) I went with a dark grey at first, but then needed to drybrush some lighter gray to bring out the detail. The boils used a Citadel Averland Sunset, and I'll add some spot touches of Technical 'ardcoat later to give them an unpleasant shine.
His tool of the trade looks to be a mattock. The base colours here were Leadbelcher for the metal, and Mournfang Brown for the wood. To rust up the head I used a very watered-down Vermin Brown wash (quickly dabbed off so it looks irregular) and then dry-brushing/ dabbing on technical Ryza Rust for that bright orange look.
Also, any self-respecting shambling monster wouldn't be seen dead without a faded demin sleeveless jacket, right?
Riot
Six rioters here, so they just need a bit of variation. As these are monopose models you'll want to differentiate these using colour/ fashion choices. These guys (they are all guys) look like the hard-working men of Arkham, so I went with down-to-earth colours and blue denim.
The darker denim recipe is Citadel Contrast Talassar Blue, mixed with a small amount of Contrast Black Templar. Lighter denim is done using Aethermatic blue or just Talassar Blue. For the brown trousers I started by using a Contrast Snakebite Leather but it looked terrible, so recovered with a Wraithbone and did a more traditional Mournfang Brown with Agrax Earshade wash and Vermin Brown drybrush. (Contrast Snakebite Leather is one of the best contrast paints IMHO, but it works best on small, highly detailed parts of a model.)
For the trousers and shirts, a quick drybrush using a lighter shade works wonders at bringing out the detail. Highly recommended if you have time. Contrast Apothecary White is great for white shirts and other textured surfaces. It automatically creates blue/ grey depth or shadows. Sometimes that can be overwhelming, so a Corax White drybrush on the raised areas of the shirts will reduce that effect.
Although it adds a bit of time, I think it is worth doing a couple of the small details like belt buckles and belts. A bright steel colour like Citadel Runefang Steel makes the buckle stand out and adds a nice visual detail.
For metal tools I start with a leadbelcher, then a Nuln Oil wash, and finally Runefang steel highlights. For wood handles I use Mournfang Brown, then a Vermin brown drybrush.
Deep One Hybrid
The great things about these models is they have a LOT of texture (chunky jumpers and heavily creased trousers), which makes them perfect for Contrast paints and getting them done quickly. A single coat of Contrast paint gives you good coverage and contrast, but a drybrush will add nice highlights. I used both here.
- Light blue jumper: Contrast Talassar Blue with Lothern Blue drybrush.
- Denim trousers/ dark blue jumper: Talassar Blue mixed with a small amount of contrast Black Templar.
- Grey trousers: Contrast Space Wolves Grey.
- Brown trousers: Contrast Gore grunta fur or Cygor Brown.
If you want to do details, the worms/ tentacles pushing through their clothes are a good chance for this (Moot Green), and the nails sticking out of their clubs. (You could also rust those nails up with a nice bright rust effect for more interest.)
Ghosts
I only had Ork Flesh and Moot green in my paint tray for these ghosts, so used light green (Moot Green) with progressively lighter highlights drybrushed on to bring out some detail. Chains were Citadel Leadbelcher with a home-made rust wash (heavily watered-down Vermin Brown.) I think I used a tiny bit of Ryza Rust too.
If you don't have greens, search around and you'll find fantastic looking models done with blues and whites.
Deep Ones
These denizens of the deep were a good opportunity to use a technique I've used before, where the underside of a water creature is a lighter colour than the back/ top. I think of this as a form of camouflage. Although these are quite bright due to the Contrast Aethermatic Blue, the belly is made lighter to add a bit of visual interest. Nails I left black to make a change. Their teeth stand out nicely if you drybrush any kind of white (Wraithbone, Corax White etc.)
You can see that I've only used a gloss varnish so they are shiny. This is deliberate so that they look 'wet'. Perhaps they have just left the ocean deep and crawled ashore, commanded by some unseen master or mistress?
Priest of Dagon
Along with the cultists (below) I tied together these models with variations of the same scheme: Green using Ork Flesh contrast paint. Purple trim done using Naggaroth Night. Reds were Khorne Red base with Mephiston Red highlights. The Ork Flesh didn't work out well because the robes are a flat surface - Contrast paints can pool if you aren't careful.
Highlights on the priest were painted on using Mephiston Red. To make lighter shades of red I added a Wild Rider red to lighten the Mephiston. (Using white makes the highlight too pink if you aren't careful.)
While the priest (and cultists below) suffer from 'bendy staff' syndrome, these do offer a chance to add a nice visual highlight. Each cultist staff has an 'evil eye' motif, and the priest has a staff topped with a gem or orb set in a metal grip. When I have time I'll spot varnish the gems/ eyes.
Cultists
I've covered the paints in my notes on the Priest above, so we'll leave these guys alone. (Also, for some reason I found their faces and eyes a nightmare to paint - so much so that I suffer -1 horror just thinking about it.)
Hunting Horrors
Another model that comes up really well by just combining a coat of contrast paint with drybrushing, Hunting Horrors are a joy to paint! All those spiny ridges and torn membranes on the wings look great with contrast paints.
The wings were Ork flesh. They actually came out lighter than the images how and pop really nicely (see the Star Spawn below for a better idea of the true colour.). I gave a guick drybrush of Moot green to lighten up the raised areas, but it wouldn't be necessary if you are in a hurry.
The skin was Contrast Space Wolves Grey, with a drybrushed highlight of Corax White with Adeptus Mechanicus Grey. I left the eyes Khorne Red, and spot of 'ardcoat varnish will make these stand out nicely. The talons were a Wraithbone with an Agrax Earthshade wash.
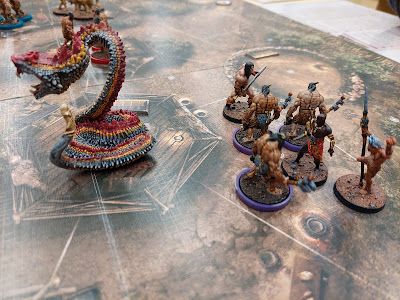
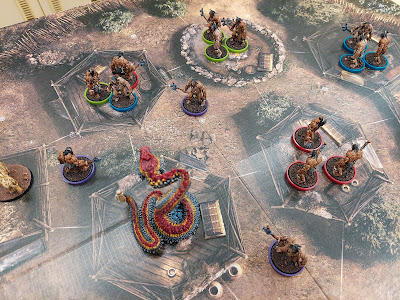
Star Spawn
The Star Spawn are absolutely my favourite models in the base box (I've heard that these are a later sculpt?). Although the moulds can be weird and warped (the wings don't look great) the texture in the model make these dead easy to paint (if time consuming because they are large!)
Colours here were:
- Skin: Contrast Ork Flesh (a LOT of Ork Flesh) with Caliban Green/ Moot Green drybrush highligh.
- Tentacles, bone spurs and nails: Nagarroth Night (purple) with a Corax White/ Nagarroth Night drybrush.
- Eyes: Averland Sunset with a FlashGitz yellow highlight. Pupil = Abaddon Black.
After a coat of 'ardcoat gloss varnish, I did a second coat of Stormshield to dull it down (except the tentacles, where I thought they would look nastier if wet!). However, knowing that these models would see heavy use and be picked up by the wing edges, I then did a second coat of 'ardcoat on the wing edges (only) and then a second coat of Stormshield over that same area. That should make the most-touched areas nice and durable.
I was really happy with how these came out. The three main colours work together well on a colour wheel and they look good here. The eyes really stand out! If you wanted to spend a lot more time you could do more highlights on the veins, but...there are a lot of them.
Painting notes and photo backgrouns
I've recently settled on using a combination of Contrast paints for speedy initial coverage. I then supplement this with drybrushing or highlights using regular paints if I have time. This works well if you are in a hurry or don't have the patience to spend a lot of time of multiple copies of the same mould (like cultists.) For many of these models just a single coat of Contrast paints brings them to tabletop quality.
I can't overstate the value of varnishing these models. Although I don't do this for my Warhammer armies, I do this for these smaller tabletop games for a few reasons:
- All my warhammer armies have dedicated storage solutions that use foam to protect each model. For MoM (and Descent) I use a home-made box organiser solution that doesn't offer the same level of protection.
- A Warhammer game might have tens of models per player, so individual models aren't going to be manhandled too often. I feel that in a game like this the models will see a lot more manhandling
- Varnishing saves time later. You are less likely to have to do touch ups and repairs.
- Varnishing is a painting technique. Using a 'spot varnish' on specific areas to add shine is a very simple but effective technique. Gems, polished shoes, eyes, and even bald heads (!) benefit in my opinion
You can download the photo backdrops used by visiting the following excellent blogs:
- Blackdog Painting Studio (I think these are the ones I use!)
- Massive Voodoo
- Tangible Day article on taking photos of minis (see below the post to download at no cost, but must complete the checkout process.)
Final thoughts
Now that these are done I'm excited to play my next game of Mansions of Madness 2e. I hope you like them!
Cheers,