Sunday, August 25, 2013

Black Templars - The coming Apocalypse


++Message Begins++

Hail Brothers! 

You read these words in troubled times, for we face great change, and have we not been unchanging?

Never have we, the true crusaders of  the emperor,  faced such uncertainty, but we must  remain strong in our faith and our mission. Many of us have had our thoughts clouded by rumour, and there has been much wailing and gnashing of teeth. As a crusader I too have felt myself fall prey to my inner fears, fears that we shall lose our identity, and our power, through a coming change - possibly the greatest in our long history.

However, we must hold our heads up high and focus our thoughts.
Is it not true that the ONLY certainty in the galaxy is change?
Is it not true that any distraction itself causes us to shy away from our true calling, the smiting of our enemies?
Is it not true that we have long faced hardship caused by our unchanging ways, only to struggle on heroically in the pursuit of victory?

I entreat you brother - think back.

Did you become a battle-brother because you were attracted to the rigor of our ways, our values, our history and the purity of our cause?
I tell you REJOICE because these things cannot be taken away from us.

Did you become a crusader because you saw that our order of battle would lead to righteous victory?
I tell you REJOICE in the knowledge that we may find new strategies and tactics to destroy our enemies.

REJOICE also in that this change will lead to greater knowledge of our chapter. More Neophytes will join our cause, bringing with them new zeal to smite the foe. 
REJOICE that our crusades will have access to new tools with which to face the darkness, and extinguish the life and light in the eyes of the enemy.
...and finally, BE SAFE in the knowledge that whatever change we might face, we shall still experience the joy of friendship with others who share our mission...

++MESSAGE ENDS++

...and of course, share our love of the tabletop wargaming!
:-)

The post above is prompted by the forthcoming release of the new Space Marine Codex for 40K, and in it (apparently) content for several different chapters - among them the Black Templars. 

This is a very different approach to the past for Black Templar players, as there had previously been a separate Codex that codified our rules. Being rolled into the new codex seems to have led to some unhappiness that the BT (or "Angry Mehreens") are being lessened in status. Most players had hoped that as the Templars had not had a new codex for many years there would be a separate one. 

I can understand the concerns and the frustration - no enthusiast likes to feel left out of a party, especially when they have committed a good deal of blood, sweat (and money) to a cause, but I see plenty of reasons to be positive, which you will likely have picked up above.

a.) New rules force us to move away from fossilized play styles - you might not like them, but the challenge itself is good isn't it?

b.) If the new codex gives us access to existing or new Marine weapons or tools, that is good from a modelling and army building point of view right? (I am NOT saying that lightly - I understand the financial implications of purchasing new units. However let's be honest, for better or worse this is a very expensive hobby and has been for some time. If you play this game you have already found some way to get the money, source the models, or kitbash them.)

Of course, it is easy for me to say this, as I am mainly a collector and painter (I don't get in a lot of games due to my location and other things), and I am a very recent recruit to the BT cause. In addition, I tend to purchase based on whether I like the fluff of an army, or the look of a model (hence my most recent purchase of two Predator tanks to bolster my BT army - even knowing that the new codex was coming out I think there is little chance that this iconic piece of kit will be retired).

Personally, I can't wait to see the new codex and find out what is in store for the Black Templars.
Worst case scenario? We lose a few iconic and characterful rules (OK, I bet some of you hate me now!) and our stats get worse (is that possible?) but that won't change why I love 40K:
-Great battles with moments to savor.
-Good banter with other players.
-The site of painted armies on the table.

Speaking of which, here is an updated photo of where my Black Templars chapter is right now (some units still WIP.) Hope you like them!


Land Raider - WIP


"Hi ho, Hi ho, it's off to smite we go!"

"Everybody go THAT way!"


Typhoons - WIP


Cheers,
*Squeek*

Monday, July 22, 2013

How to Paint a Tau "Longstrike" model.

*Squeek*


"You put your left foot in, your left foot out, in out, in out..."


When the new Tau Codex came out, I decided that having recently had quite a severe case of "EBay Addiction", (coupled with a nasty bout of "spending too damn much money") I would only purchase a few core units, and only then ones that really took my fancy. My logic for this was that I already had a large Tau force, and I didn't want to paint too much new stuff!

For that reason, I purchased a Riptide, (which you can see here), a Fireblade (not started) and Longstrike, "Heavy Armour Hero TM". Although I haven't played any games with these new Tau units, I figure Longstrike must almost be an "auto-take" if you are fielding Hammerheads (and facing Tyranids, which are my usual opponents.)
-Can overwatch unlimited times?
-BS 5?
...Yes please!

I can't report on his performance on the battlefield yet, but I can share with you how I painted him! (Quick  disclaimer - the turret he is in, and my other Tau, were painted without washes etc, so they will look weird next to him - and my battle-damaged Riptide - but I hope to get around to weathering them all at some point!)

Paints used (Old/ New):


  • Skull White (White Scar or Ceramite White)
  • Chaos Black (Abaddon Black)
  • Dwarf Bronze (Hashut Copper)
  • Shining Gold (Gehenna's Gold)
  • Red Gore (Wazdakka Red)
  • Blood Red (Evil Sunz Red)
  • Mordian Blue (Macragge Blue)
  • Codex Grey (Dawnstone)
  • Washes:
  • Devlan Mud (Agrax Earthshade)


Step 1: Preparation.

Use a craft knife or file away flash/ mould lines (carefully!)  Pay particular attention to this on flat surfaces, such as helmets and shoulder pads, as mould lines really show up later when painted if you don't get rid of them, especially when using white paint.


Step 2: First basing.

As Longstrike is going to stand in a turret, I didn't make any base for this model.


Step 3: Undercoat.

Spray paint the model(s) using the undercoat of your choice.

I use Citadel Skull White for my Tau. One of my army colours is white, so this reduces the number of white layers I need to add later. Many people prefer a Chaos Black undercoat. The overall effect will be darker but any bits in recesses you forget to paint or are difficult to get at just look like shadows (which is great). Unless white is an important colour in your army, you may prefer black because it is more forgiving.


Step 4: Basecoats.

This is where you add the basic colours to your model. After you finish this, you will be a big step closer to a finished model, but the colours will be very "flat" (which is why you will then add washes in step 5, below)
TIP: As with most models, I follow an "Inside Out" order of painting. This makes it easy to cover mistakes as you go along e.g. Start with the innermost items first. In this case, the under armour of Longstrike's suit is done in black. Then, the white armour plates are on top of those, so they are done next, finally, the details on top of the armour plates are done (info display on the forearm etc.)
  • Chaos Black (Abaddon Black): Boots, gloves, uniform (between armour plates)
  • Skull White (White Scar or Ceramite White): Armour plates
  • Dark Angels Green (Caliban Green): Digital display on Longstrike's forearm
  • Dwarf Bronze (Hashut Copper): Piping around gloves
  • Red Gore (Wazzdakka Red): Buttons/ indicators on suit/ armour
  • Mordian Blue (McCragge Blue): Skin

Step 5: Washes.

In this step, you are going to add shadows by adding a wash. You can either paint this into specific areas, or (as in this case) add a wash all over by applying liberally across the model.
For Longstrike, I used Agrax Earthshade on the whole model (which would usually give a dirty, grubby effect).

TIP: To save time later, consider not applying washes to the armour plates. I applied a mud wash all over, but actually looking at the model now, I am not sure of the benefit of doing that. NOT doing this would save you reapplying white again later to clean up the armour etc. If you DO wash the whole model and you are using white, you will have to reapply several layers later (as I did for the model above) unless you want Longstrike's armour to look as though he just crawled out of a peat bog.

TIP 2: If you are like me, and you hate painting the eyes on models, consider giving a second, heavy wash around the eyes off the model. From a distance, this will look like natural shadows and good enough! (Hey, I bet Longstrike doesn't get his beauty sleep right?)


Step 6: Layers/ Highlights

Highlights or progressively lighter layers of paints provide further differentiation to the raised parts of the model from the shadowed areas you created by using washes in step 5. (Drybrushing is another way to do this.)
For Longstrike, most of the effort went into bringing the armour plates back to white:
  • Armour Plates: Ceramite White: (Several layers necessary!)
  • Skin: Mordian Blue, followed by a Mordian Blue/ Skull White 50/50 mix.
  • Digital Display (on forearm)Dark Angels Green, followed by a Dark Angels/ Snot Green mix (50/50). Add a dot of white in one corner if you want a "Glass-like" effect.
  • Switches/ Suit indicators: Red Gore (Wazzdakka Red), followed by Red Gore/ Blood Red (Evil Sunz Red) mix. OR, use green as above if you don't want to use red.
  • Piping on gloves: Dwarf Bronze, followed by Shining Gold highlights.


OPTIONAL: Fortress Grey: Highlights on the edges of boots etc. (No-one is ever going to see this if you actually decide to glue him in to a turret!)


Step 7: Final Basing

As there isn't a base in this case, there ain't no "Final Basing" necessary.
ALL DONE!


*Squeek*

Sunday, July 21, 2013

500 Points of Skaven and High Elves.

*Squeek*

Enjoyed a quick game the other night at 500 points v. High Elves.

The idea was to just focus on the mechanics of the game so that my colleague could reacquaint himself with the mechanics of WFB and the 6th edition (after many years away).

Here are the two lists we used - both made to focus on core mechanics rather than competitiveness (e.g. only wizards as level 1, a mix of troop types, no magic items etc.) Photos after that.

High Elves: (500 Pts)

x1 Mage - General
      1 Talisman of Protection

x15 Archers

x5 Sword Masters of Hoeth 

x15 Spearmen

Skaven: (500 Pts)

 Chieftain with Shield and Halberd - General

Warlock Engineer - Level 1 Wizard

x20 Clanrats  with Full command and shields

     + 1 Poisoned Wind Mortar Weapon Team

x20 Clanrats with Full command and shields

x30 Skavenslaves 

 x10 Giant Rats and 1 Packmaster 

After rolling for spells (HE got "Soul Quench" - which sounds like a depressing energy drink to me - and the Skaven stuck with warplightning) we went to war!

The High Elf central position

The Skaven advance
High Elf shooting starts to take a toll...


A unit of slaves and Giant Rats heads up one flank...
The Swordmasters rally...
...and so did the Mage and Archers after they later fled...
After easily seeing off the Slaves (the mage had reduced the entire Giant Rats
 unit to ash in one turn) the spearmen turn around, but can't make it back to the
main battle.
Usual Skaven happenings:
a.) initial excellent performance by the poison-wind mortar killed half the unit of archers in one go, only to see a misfire on the next turn where he poisoned himself...(a two model unit with 1 wound...'nuff said)
b.) a x30 Skaven unit bounced-off the spearmen without doing anything.
c.) The other x30 Skaven unit (with the warlock engineer) chose to flee from a charge - and didn't stop fleeing! I'd only had the chance to try warplightning once or twice (but one of those took out half the small unit of Swordmasters)

Rules questions:
1.) Can Wizards cast magic after rallying? (I now think that the answer is "yes")
2.) Does the new H.E. rule "Martial Prowess" also allow a unit with the rule that is attacked in the flank to fight in TWO ranks, rather than just the usual one? (I think the answer is yes, as there is nothing stated about this?)

Sadly, this was a mega victory for the High Elves, as by the end of the game most of my units had left the table. There was definitely a "Man of the Match" though, and that was the lone Swordmaster who refused to flee in the face of a unit of clanrats, and managed to hold his ground!

The game was full of the usual Skaven surprises though, and I probably nearly made the game equal because at the end of turn five x3 HE units were running for the table edge, only for them ALL to rally at the beginning of turn 6.

Thanks to my opponent for a fun game!

*Squeek*


Sunday, June 30, 2013

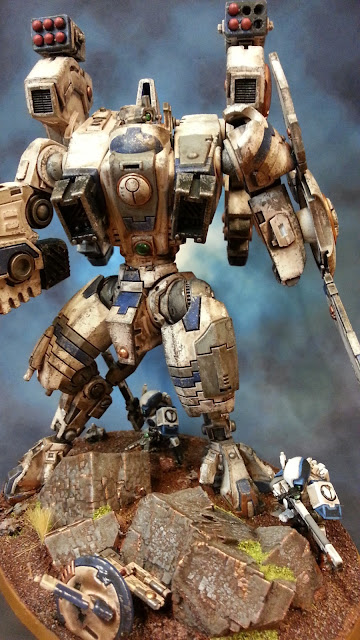
Tau Riptide - Finished!

*Squeek*

It has been a very slow process (work, motivation etc!) but I finally got my Riptide to a point where I am happy to use it on the table. This was my first attempt at weathering a vehicle, or in fact, to use weathering at all, and overall I am quite happy with how it turned out.

I have decided to call it "Found it!" (or "Drone Recovery")
I imagine a Tau cadre caught up in a long, long campaign. Knowing that re-supply may not be coming, they have to recover as much damaged equipment as they can, even down to Gun Drones.
The Cadre commanders therefore orders recovery teams sent into the field. Knowing that his resources are low, these recovery teams are ordered to proceed with caution. They are backed up by heavy units (like the Riptide) but only to provide covering fire for retreat in cases where they are discovered.

Here are some photos, with more comment below:


Looking back, what was interesting to me about this model?


  1. Having a "scene"/ "story".
    • The Riptide base is large and this gives lots of options for doing interesting things. In this case, the "Drone Recovery" scene. I liked that I could use the Firewarrior with scanner model almost as though he is using it to find the drone.
  2. Trying weathering for the first time. 
    • Thanks to this great tutorial on YouTube I discovered the process is actually not difficult! (It was still a bit nerve-wracking though)
  3. Really heavy use of washes to indicate age, not just shadows.
    • The downed drone was really heavily washed so that it looks as though it might have been out there a long time. I think it works out well.
  4. Mixing textures (?).
    • Although difficult to see in the picture, I added Dwarf Bronze highlights on the stones so they look as though there are seams of some precious metal. I have never done that before, usually just going with "stone".
  5. Greenstuff.
    • I haven't used Greenstuff much before, but here I used it to blend in the gap between the base of the stones with the model base, because there was a big gap. Hopefully that gap isn't noticeable now.
  6. Used missile pods.
    • I chopped these off and drilled them out a bit so they look used.

As I often find, in the cold light of day (I took these photos last night) there are lots of things still to do though:
a.) The missile pod tubes aren't bored out to the same size. I don't have a proper drill. They should all be the same diameter.
b.) The Snakebite Leather on the base edge could use another layer (it feels very thin now).
c.)...and other things I am sure I will notice!

I'll add the Riptide to my Tau Army page.

All C&C welcome!

Cheers,
*Squeek*

Sunday, June 16, 2013

How to Paint Tau Fire Warriors

*Squeek*


Before the Skaven came into my life, my re-entry point into the hobby was the world of WH40K, and in particular, taking up the good fight "For the Greater Good". I put together quite a large Tau army (which you can see here) 
However, the Chattering Horde blog was started to accompany me on my painting journey with Skaven, and as the Tau were before that there have been no Tau guides here.

With work progressing on my Tau Riptide, I had the chance to work on two Fire Warriors that I will be using on the base. As these guys used my original army colours, but with the addition of some of the simple painting processes I learned later while working on the Skaven, I thought this would be a good chance to put up a painting guide.

A couple of things to note:
1.) I sometimes still use the original (older) paints from GW. If you need it, there is a conversion chart here and I have tried to put the names of the new paints below as well (but note, the colours don't match exactly!)
2.) This is a rough guide, suitable for getting stuff on the gaming table. No claims to greatness or expertise here. Also, it is always a good idea to paint a test model to see how it looks before ploughing ahead with a whole army.

So here we go!

Paints used (Old/ New):

  • Skull White (White Scar or Ceramite White)
  • Chaos Black (Abaddon Black)
  • Bleached Bone (Ushabti Bone)
  • Dark Angels Green (Caliban Green)
  • Snot Green (Warpstone Glow)
  • Dwarf Bronze (Hashut Copper)
  • Shining Gold (Gehenna's Gold)
  • Codex Grey (Dawnstone)
  • Fortress Grey (Administratum Grey)
  • Red Gore (Wazdakka Red)
  • Blood Red (Evil Sunz Red)
  • Regal Blue (Kantor Blue)
  • Mordian Blue (Macragge Blue)

Washes:

  • Badab Black (Nuln Oil)
  • Devlan Mud (Agrax Earthshade)

Step 1: Preparation.

Assemble models.
Use a craft knife or file away flash/ mould lines (carefully!)  Please make sure you pay attention to this on flat surfaces, such as helmets and shoulder pads, as mould lines really show up later when painted if you don't get rid of them, especially when using white paint.


Step 2: First basing. (note: the photo above shows unbased models, but I usually base everything as described below)

Sand down any flash or raised areas around the edge of the base. 
Apply PVA glue to the top of the base, being careful not to get this on the boots of the model. (For variety, consider sprinkling a couple of pieces of crushed coral onto the PVA before the sand.)
Immediately dip the base into modelling sand.

TIP: Rub away any sand or glue that has dripped over onto the sides of the base now if you prefer a nice (clean-looking) base later.

Optional: Finish off the bases now (see Step 7, final basing).


Step 3: Undercoat.

Spray paint the model(s) using the undercoat of your choice. 

I use Citadel Skull White for my Tau. One of my army colours is white, so this reduces the number of white layers I need to add later. Many people prefer a Chaos Black undercoat. The overall effect will be darker but any bits in recesses you forget to paint or are difficult to get at just look like shadows (which is great). Unless white is an important colour in your army, you may prefer Black because it is more forgiving.


Step 4: Basecoats.

This is where you add the basic colours to your model. After you finish this, you will be a big step closer to a finished model, but the colours will be very "flat" (which is why you will then add washes in step 5, below)
  • Skull White (White Scar or Ceramite White): Armour plates, helmet, rifle panels (see image above)
  • Chaos Black (Abaddon Black): Boots
  • Dark Angels Green (Caliban Green): Lenses on helmet (and lenses on Rifle if you prefer green lenses to red lenses)
  • Dwarf Bronze (Hashut Copper): Pulse rifle lens detail (the round bit at the end!)
  • Codex Grey (Dawnstone): Trousers, sleeves, neck on the helmet, rifle panels (see image above)
  • Red Gore (Wazdakka Red): Pulse Rifle targetting lens
  • Regal Blue (Kantor Blue): Half of helmet, lower and upper part of should pad. Center panel on armour.


Step 5: Washes.

 In this step, you are going to add shadows by adding a wash. You can either paint this into specific areas, or (as in this case) add a wash all over by applying liberally across the model.
  • Badab Black (Nuln Oil)
  • Devlan Mud (Agrax Earthshade)
To give a dirty, grubby effect, use Devlan Mud. On weapons, or metallics, Badab Black is very effective. In this case, I think I mixed 50/50 and applied to the whole model.
 Tip: To save time later, consider not applying washed to the helmet. If you do and you are using white, you will have to reapply several layers of white later (as I did for the model above)


Step 6: Highlights

Highlights provide further differentiation to the raised parts of the model from the shadowed areas you created by adding shadows. (Drybrushing is another way to do this.)
  • Skull White (White Scar or Ceramite White): reapply to edges of armour.
  • Bleached Bone (Ushabti Bone): reapply to edges of pulse rifle white panels.
  • Dark Angels Green (Caliban Green)/Snot Green (Warpstone Glow): apply 50/50 mix to the edge of the lenses on helmet and/ or rifle as appropriate.
  • Dwarf Bronze (Hashut Copper)/ Shining Gold (Gehenna's Gold): apply 50/50 mix to the upper edges of the pulse rifle part (the round bit at the end)
  • Codex Grey (Dawnstone): reapply to raised folds of the trousers and sleeves, as well as to the upper edges of the boots.
  • Codex Grey (Dawnstone)/ Fortress Grey (Administratum Grey): apply 50/50 mix to the very top of the raised folds of trousers and sleeves.
  • Red Gore (Wazdakka Red)/Blood Red (Evil Sunz Red): add 50/50 mix to lower corners of targetting lens on the Pulse Rifle. 
  • Blood Red (Evil Sunz Red): add to lower corner of targetting lens.
  • Mordian Blue (Macragge Blue): Edges of shoulder pads.
TIP: The Firewarrior model has a couple of lenses (the Pulse Rifle targetting reticle and the lenses on the helmet). I found this tutorial about lenses on the absolutely excellent Advanced Tau Tactica site to be very useful (not to mention all their articles and tactica!)


Step 7: Final Basing

Note: Although the models in the picture above are not based, the process described is what I usually do.

Calthan Brown: Overbrush across the base, being careful to avoid the boots/ legs of the model.
Snakebite Leather: Drybrush across the base. Paint the base edges. I usually find 2 coats gives a nice smooth finish.
Codex Grey: Drybrush lightly across the base, paint any crushed coral.
Fortress Grey: Drybrush any crushed coral rocks to add a natural highlight. Paint on PVA glue, and then sprinkle static grass onto the base.
...and that is it! 

I hope one day to have time to go back to my Tau army and use washes and stuff, but when I do, this is how I will do it.

Cheers,
*Squeek*


Related Posts Plugin for WordPress, Blogger...