Tuesday, January 31, 2012

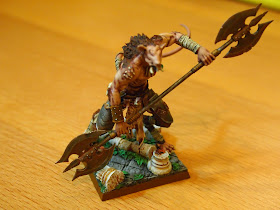
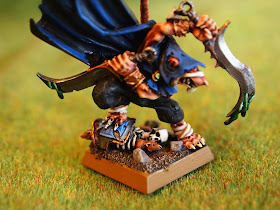
Skaven Vermin Lord/ Scar-Scath finished. (Pics)

*Squeek*
"For but a brief instant following its appearance, the meeting went completely silent and still (unheard of in any gathering of Skaven, let alone where so many warlords and their egos were present),following that, the only movement was a barely controlled twitching of whiskers and shivering of collective fear. 


Not a sound, neither skittering of claw nor click of yellowed teeth,could be heard. Even loyal wolf-rats become momentarily immobile despite the musk of fear hanging heavy in the air. Loyal guards without the chamber, usually so alert to such scents and signs of trouble within and ready to take up arms, held still, lest whatever had come into being should deign to notice them.


Where but a moment ago Warlord Rentnail had preened and puffed his chest the attendees could see but little. Only a charred and smouldering pile of rags and a glint of the jewelry he had favoured, now melted and fused with charred bone, remained to show he had even been there. (Unusually, none made a move to scavenge such useful - if gore-covered - resources) 


The Vermin Lord cast his burning gaze around the room. Fixing in place all present, the red pits of his eyes effortlessly quelled even that most primeval Skaven impulse - flight before overwhelming power.

"Yes, yes warlords,now hear-listen the word of the 13 and obey" 


Thus spake Grey Seer Riknit. 


Alone among them in gathering his wits, he was determined to take advantage of this silence among his audience to unveil his grand plans to unite them, however briefly, in attacking the hated man-thing citadel to the South. Though his scheme would be somewhat affected by the loss of the ever-impressible Rentnail, the Grey Seer knew that it would be only a matter of moments before a new leader arose to fill that position of leadership...


More troubling was that despite appearances, (and unknown to his audience) it was not he who had not summoned this embodiment of the Great Horned One...
...and if not he, then who? 
...and of even greater concern...
...why?"


-------


Tonight I nearly finished-up Scar-Scath, Fiend of Vermin (my "counts as" Vermin Lord).


Some photos:


All comments and criticism welcome! Hopefully I will have some time to post more pics and a proper write-up soon.


Thanks for coming by!


Cheers,
*Squeek*


Sunday, January 29, 2012

Painting update: Scar-Scath

*Squeek*

After finishing Queek Headtaker and Deathmaster Snikch, I decided to stay on single models rather than units. To that end, I finally turned to the 800lb gorilla on my shelf...

...Scar-Scath, Fiend of Vermin.
Copyright Maelstrom Games.
Part of the BaneBeasts range over at Maelstrom, I thought it would be pretty cool to use him as a Vermin Lord (I'm not a big fan of the GW VL model.) I got him ages ago and never got around to him. To be honest, as a beginner, I found the thought of working with my first resin and a larger model (which would show all my mistakes ...) to be a bit intimidating.


To make things a bit easier on myself I am doing the model and base separately (the detail on the base would be very difficult to reach with Scar in the way.)


Priming.


Before priming the whole thing, I got Scar in the position that I wanted and held him in place with Blu-tack. While still blu-tacked, I then primed with Citadel Chaos Black spray. After it was dry I carefully separated the model from the base and peeled off the Blu-Tack. This left me with an unprimed area. This is useful because I know exactly where to glue in the future and also because I think my glue will work better on an unprimed surface.


Microart Studios Base.
Microart Studios has a great range of bases. I have one of their Ancient Bases 50x50mm parts that Maelstrom sent me (to replace the missing Scar-Scath base that should have come with the kit.)

Colours I am using:
  • Codex Grey: Flagstones
  • Bleached Bone: statue, columns
  • Knarloc Green: leaves
  • Calthan Brown: branches/ roots
  • Snakebite Leather:  Base edge


I also had time to do the washes:
  • Gryphonne Sepia: statue, columns
  • Thraka Green: leaves
  • Devlan Mud: flagstones


On reflection I think I should have used Deneb Stone for the columns and statue as they currently look very yellow. I'm hoping though that layering using a Deneb Stone/ Bleached Bone should build up to a lighter overall shade and correct that. Topping it off with a nearly white drybrush will also (fingers-crossed!) help.


One thing I have learned (and still try to remember when being critical midway through painting something) is not to judge a piece until it is finished. (Often everything comes together right at the end and looks better than you think!)


Scar-Scath.
On Scar himself, I went with a very basic set of basecoat colours:

  • Tallarn Flesh: Skin
  • Boltgun Metal: Weapon
  • Snakebite Leather: Belt, weapon grip
  • Calthan Brown and Bestial Brown: Fur
  • Bleached Bone: rags/ wraps, nails, bone skulls, bone ornaments
  • Dark Angels Green: Warpstone chunk. (OK, it isn't really warpstone, but I think I can make it look close for a thematic tie-in! )


These are basically the same colours I use on my clanrats.


Washes:
  • Devlan Mud: metal, fur, rags/ wraps.
  • Ogryn Flesh: Skin, hands etc.


The next stage, layering, is going to be a big challenge for two reasons:
  1. Getting the colours right on the stone/ statuary on the base.
  2. Layering those large areas of skin on Scar.

I will try to post another update later this week. Wish me luck!
:-)


Cheers,

*Squeek*


p.s. Super-quick additional photo update - pretty much got the layering and highlights done on the base...


Thursday, January 26, 2012

Queek Headtaker finished!

*Squeek!*
If there is one Skaven "Hero" that truly lives up to that word, it is probably Queek Headtaker, of Clan Mors. Aside from having some pretty good stats for a Skaven, I like the fact that he is just simply an evil killer!


Hope to have a step-by-step painting guide up over the weekend, but in the meantime, a few photos! (more comments below)


The original Games Workshop model:
Copyright Games Workshop: www.games-workshop.com 
Colours
As you can see, although similar to the Games Workshop colour scheme used for packaging and on their website it isn't quite the same. I originally intended the Mechrite Red used on the armour to be a darker base colour, onto which I would add Blood Red. However, after getting through the washes the Mechrite Red started to grow on me. As it is darker, it seems (to me) to suit the Skaven more than a brighter shade.


Like the GW model, I used a lighter colour on the cloth between the legs, in this case a Bleached Bone (washed with Gryphonne Sepia) and then drybrushed in lighter shades.


Finally, on "my" Queek I have part of the cloth edge to the armour in Ice Blue, which ties in a bit with my Warlord Clan - quite subtly I think.


Finecast:
I've mentioned this before, but my limited Finecast experience so far has been pretty dire...
...and regrettably, this Queek Headtaker casting only reinforces that experience. Painting the model has only made the poor casting more noticeable. Although difficult to see in my photos, the horns on the helmet are quite deformed, and where the crest joins the main part of the helmet is also odd, with some bubbles.


Given more time I might come back and file them back to decent points and repaint them, but I'll leave them alone for now.


Back Banner:
I left this off totally. 
Holding the model together before gluing I found it difficult to reconcile just how large the back-banner is with my image of Queek! In battle, I figure him being incredibly fast - a strange combination of Skaven skittishness with deadly efficiency, something that I couldn't really imagine with that huge back-banner. Maybe his back-banner is removed by an underling before battle?
Using Green Stuff, I covered the hole on his back where it would have been positioned.


As always, all comments and criticism welcome!


Cheers,


*Squeek*


p.s. I added Queek to my Warlord Clan page.
EDIT: I have now added a "How to Paint Queek Headtaker" page


Sunday, January 22, 2012

How to Paint Deathmaster Snikch

*Squeek*

"The candle, just for a moment, guttered. To one engrossed in his studies, such as Master Evan Redwood of the Esteemed College of Engineers, such a movement would have passed unnoticed. Even to a man who was not a scholar (and therefore even at the best of times disinterested in the mundane) it would prompt 

no raising of the head.
No renewed focus on the immediate environment.
No inkling of the arrival of an assassin nearly unequaled in skill by any other living practitioner (and few undead or Daemonic)..."


How to Paint Deathmaster Snikch
Please note that I think that this process is good enough for "tabletop quality" (I.e. acceptable when viewed from a couple of feet away) I make no claim to be a good painter, but I still hope this will be useful.
Also, I don't write anything down as I am painting, (being an amateur I have a hard time just painting!) so all mixes are approximate - please experiment and adjust as you wish!

EDIT: Following the launch of the latest Citadel Paint range in 2012, please note that the colours listed below are from the previous range. I hope to have time to rewrite in the future, but for the time being, you can use the conversion chart/ list I made here or use the official Citadel Conversion chart here.

Step 1: Preparation.
  1. Remove the model from its sprue.
  2. Carefully file or trim any excess flash from the model. (If the latter, use caution!)
  3. Glue model to base.
Step 2: First basing.
I like to get the application of materials to my base done at this point to save trouble later. Doing it now allows you to correct any troublesome issues with sand it glue without worrying about any painting you might have done...

  1. Sand or trim any flash from around the edge of the base. (It really shows up when you paint it...)
  2. Paint PVA glue, optionally watered-down, onto the base, carefully avoiding getting excess glue onto feet or shoes (also claws, paws, bottom of robes etc. Etc)
  3. Sprinkle a few pieces of crushed coral onto the base. (Obtained at the aquatic section of any pet shop) I find that 2-3 is enough.
  4. Sprinkle sand over the base, so all remaining areas are covered.
  5. Allow to dry.
Step 3: Priming/ Undercoat.
  1. Prime the whole model. I use Citadel Chaos Black spray. Black is ideal for a model that will overall be darker in tone (and more forgiving for beginners like me as if you miss painting anything in hard to reach places it just looks like shadow.)
  2. Allow to dry.
Step 4: Basecoat.
In this step you will add the basic colours to the model. I used the following colours from Games Workshop (I haven't tried any other brands simply due to not having easy access to them.)

  • Chaos Black: Back of cape
  • Chaos Black/ Mordian Blue mix: Inside of cape. (Chaos Black/ Mordian Blue mix 2:10) I felt pure Mordian blue to be too bright for Snikch, but that is just me! 
  • Mordian Blue (pure) on the cross on the breastplate on the base.
  • Boltgun Metal: Weapons, including throwing stars on belt, breastplate on base, tip of hood (looks like a small mace head)
  • Dwarf Bronze: Crosspiece on swords, rim of breastplate on base, Bracers on wrists
  • Tallarn Flesh: Skin
  • Bleached Bone: Skeleton on base, teeth, nails, bandages on feet/ face
  • Blood Red: Eyes
  • Snakebite Leather: belt
  • Dark Angels Green: Jewel on clasp, poison on blades
  • Calthan Brown: Rats on base

Here is what I ended up with after basecoats:

Note: For this model, I actually went straight to highlights (step 6) and then did washes. However, at this point I would usually do washes and then highlights. Your choice! 

Step 5: Washes. 
This step adds shadow and depth to what (at the moment) will look like a very "flat" model. 
I use Games Workshop washes, again only because these are a known quantity for me. In this case I also made my own wash too... 

  • Devlan Mud: Outside of cape. Weapons. Breastplate on base. Rats. 
  • Ogryn Flesh: Skin, tail, feet etc 
  • Gryphonne Sepia: Bandages on feet/ face, skeleton on base. 
  • Mordian Blue/ Black ink wash: Very watered down mix, applied to the deep folds of the inside of the cape and on the hood. 
Step 6: Highlights. 
In this step, we build up the colours ("layering") in progressively lighter shades to achieve more greater variation between light and shadow. This could be using progressively lighter,but separate colours (Tallarn Flesh>Dwarf Flesh>Elf Flesh) OR by adding Skull White in ever-increasing amounts to a single colour. 
I'm not great at it yet, but you can find a good guide at "How to Paint Miniatures".
  • Chaos Black/ Mordian Blue mix: Inside of cape. First use a slightly lighter mix of Chaos Black/ Mordian Blue (mix 1:10) than you used as a basecoat. Then one more (slightly lighter shade) on the tops of the ridges and folds. 
  • Mordian Blue/ Skull White mix. (10:2) on the cross of the breastplate on the base.
  • Boltgun Metal: Reapply to edges of weapons, including throwing stars on belt, breastplate on base, tip of hood (loos like a small mace head) etc, but leaving the wash in areas where shadows should be.
  • Dwarf Bronze/ Shining Gold mix (1:1): Edges of crosspiece on swords, rim of breastplate on base, Bracers on wrists etc.
  • Tallarn Flesh/ Dwarf Flesh mix: (1:1) Skin, feet, tail etc. then...
  • Dwarf Flesh/ Elf Flesh mix: (1:1) on the same areas, leaving some of the previous darker shade.
  • Bleached Bone/ Skull White mix: (2:1) Skeleton on base, teeth, nails, bandages on feet/ face
  • Snakebite Leather/ Skull White mix: (2:1) belt
  • Dark Angels Green/Goblin Green mix: (1:1) mix for the Jewel on clasp and poison on blades. Follow this with Goblin Green, and then Goblin Green/ Skull White mix (2/1). For the poison, have the lighter colours at the top of the poison, on the blade, and leave the "drops" of poison darker.
  • Calthan Brown/ Vermin Brown: (1:1) Rats on base
Although taken after completion, this detail shows highlights on the hands, cape, poison etc.
Step 7: Drybrushing.
Another step that adds highlights. 

Put some of your highlight colour on your brush.Run your brush over kitchen paper (or a tissue is OK) until there is almost no paint on the brush. Then run the brush very lightly across the raised areas of the model to which you want to add the highlight colour. This should leave the highlight colour only on the raised edges. (Again, information on How To Paint Miniatures is a good guide!)
  • Codex Grey/ Chaos Black: (5:1 mix) Trousers, on raised folds, and back of cape, on raised folds.
  • Chainmail: Weapon edges
You can just see the folds of the cape have been drybrushed Codex Grey
Step 8: Final Basing.
The last step (phew!) adding colours to the base.
  1. Calthan Brown drybrush across the sand (not the rocks/ crushed Coral)
  2. Calthan Brown/ Skull white mix (3/1) drybrush across the sand.
  3. Codex Grey: drybrush across the sand. Paint onto the rocks.
  4. Codex Grey/ Fortress Grey mix (1:1). drybrush across sand and edges of rocks.
  5. Fortress Grey: Drybrush across sand and edges of rocks.
Base detail.
Step 9: Collapse!
(_ _')

 All comment and criticism welcome!

Cheers,
*Squeek*

Complete Deathmaster Snikch!

*Squeek!*

Deathmaster Snikch
I finished up the Deathmaster last night and thought I would share a few snaps today. Overall I'm torn between thinking it came out OK and thinking "hmmm, could do better".

Anyway, there were a couple of things that I did differently here than before. 

The first one was to use crushed coral on the base in addition to sand. Obviously not a big thing, but I do agree that just sand and flock can look a bit dull. The crushed coral, when used sparingly (2-3 pieces seems right) adds a very nice rocky texture without being too intrusive. I got this technique from reading the "How To Paint Miniatures" website (an excellent resource for basic techniques when starting out)
Fortunately, my kids recently started keeping fish, so crushed coral is abundant around here!

Secondly, I did more highlighting on the tail. I am not sure if I am happy with how it turned out, as it looks a bit too bright in places, but it may grow on me.

Thirdly, I did a couple of layers of highlights and then washes. Usually I do all the base colours first and then washes. I don't really see a big change, but that could just be me!

In terms of colour, I went with dark shades of Mordian Blue on the inside of the cloak, as I didn't want too much black, despite the fact that Snikch is an assassin extraordinaire.

Here are some more pics:
Base colours only.
Base detail: Note deformed toes on left feet...
Detail

Tail and cape
 If you look closely at the rat emerging from the armour in the bottom image you can see that it has no face. This is one of the casting problems that I described the other day. Not noticeable from tabletop distance at all, but still annoying. (Yes, to a certain extent my fault as I could have fixed these with greenstuff.)


(EDIT: Just added "How to Paint Deathmaster Snikch" painting guide.)
All constructive comments and criticism welcome of course! 


Cheers,
*Squeek*


p.s. I couldn't find a painting guide for Deathmaster Snikch on the Games Workshop site, so I will try to post a step by step guide in the next few days.


Saturday, January 21, 2012

More filin' n' cuttin'. Goblin Skaven slaves update 2

*Squeek*


So yesterday I started to put together a unit of Goblin Skaven slaves. These gobbo spearman models came from the 4th edition starter set (thanks for the info yesterday Ian!) As I discovered after a days work, they still all looked too uniform due to the static poses.


After sleeping on this problem, I decided today to reduce the number of spears. 
Firstly, I thought that would make them look immediately less uniform. 
Secondly, this would allow me to do more conversions from the bits box with handweapons. Finally, I reckon this would be more in keeping with slaves too.


So here they are after 3 rounds of choppin' and changin'. (Sorry the pics aren't great.)


1. As assembled. Facing diagonally.
2. At the end of day 1. Too many spears!
3. More hand-weapons, less spears.
Overall I think it had worked. The unit feels more rag-tag (at least compared to yesterday). What do you reckon? (Sorry the pics aren't great)


In addition to filing each and every single gobbo head smooth (!) I also spent some more time on individual conversions in the hope that this would give the unit more character and break up the outline if the unit as a whole.
Gobin wiv' special headgear.
'ome made spearrgghh
nice for cuttin' and choppins.
no cleva capshun ere.
Wiv man-trap.
curly-wurly blade.
big choppa
Although I am no great modeler, I am actually quite happy with one or two of them as I think have taken on a character of their own.


I reckon that with the addition of some rats to bases and shoulders I should be done and ready to start adding texture to the bases, and then move onto priming. To take a break I will then go back to Snikch and Queek. (Snikch has some washes on now, so I should finish him tomorrow.)


*Squeek*